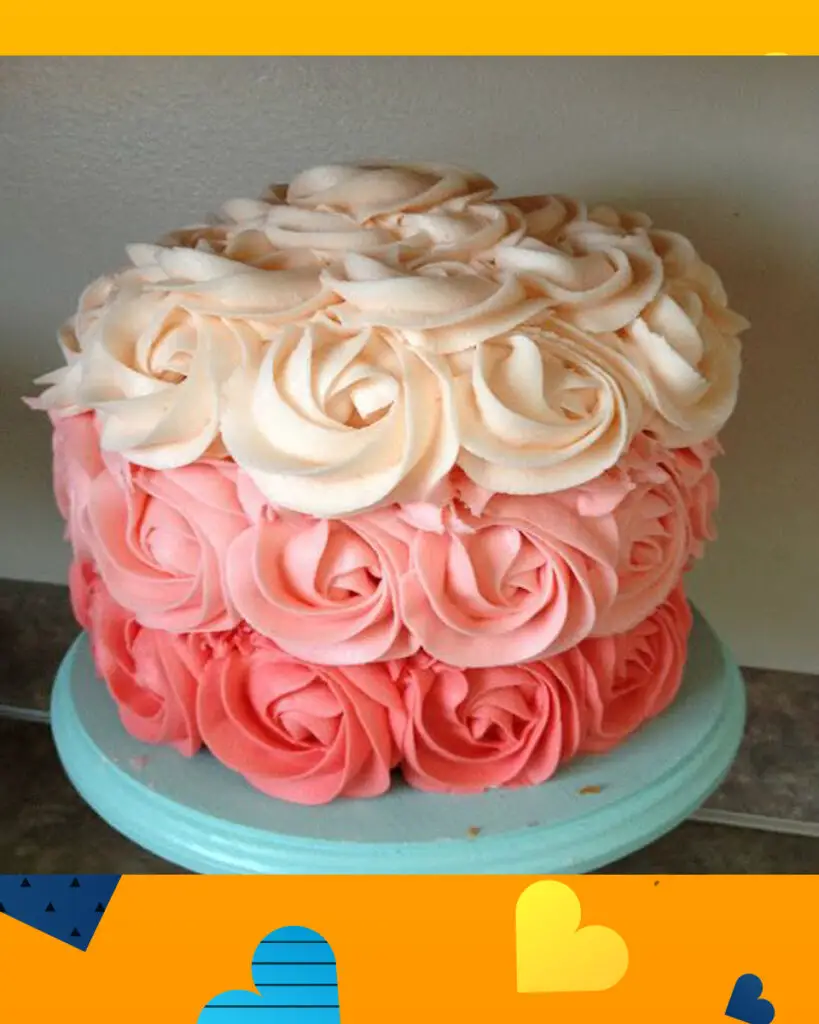
The Ombre Rosette Cake is a stunning and visually captivating dessert that combines artistry with delicious flavors. This cake, known for its gradient of colors resembling the soft, fading hues of a sunset or a beautiful bouquet of roses, is a true masterpiece in the world of cake decorating. Each layer of this cake features a spectrum of colors that transition seamlessly from one shade to another, creating a mesmerizing ombre effect. Topped with delicate and intricate rosette decorations, this cake not only pleases the palate but also dazzles the eyes, making it a perfect centerpiece for special occasions and celebrations. In this introduction, we’ll delve into the art and craftsmanship behind the Ombre Rosette Cake, inviting you to explore the beauty and taste of this delightful confection.
What is Ombre Rosette Cake?
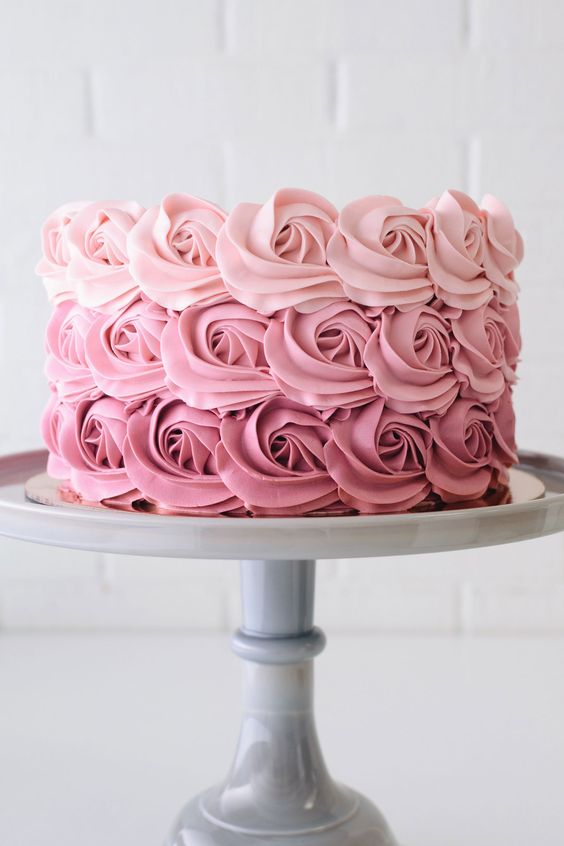
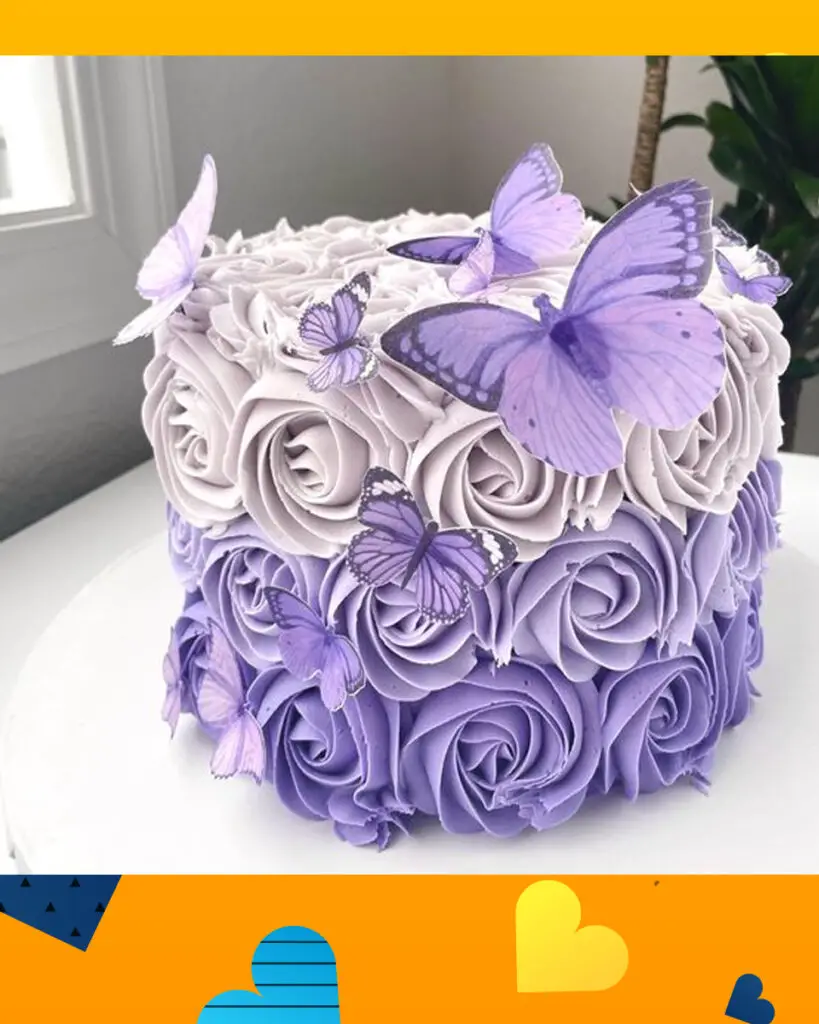
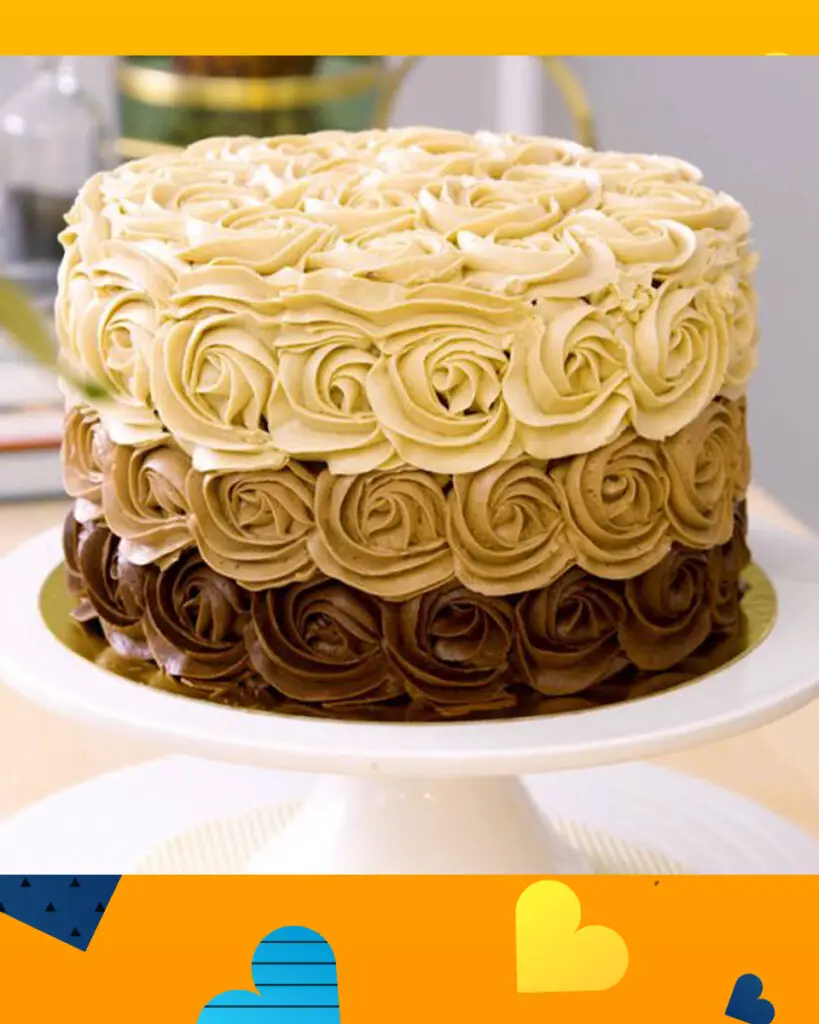
The Ombre Rosette Cake is a visually striking and creatively designed cake that combines the gradient color effect known as “ombre” with intricate rosette decorations. Here’s what the Ombre Rosette Cake entails:
- Ombre Effect: The term “ombre” is borrowed from the French word for “shaded” or “graduated.” In the context of this cake, it refers to a gradual transition of colors from one shade to another, typically progressing from darker to lighter tones or vice versa. The ombre effect is achieved by tinting the frosting in various shades of the same color, creating a beautiful, fading color gradient on the cake’s surface.
- Rosette Decorations: Rosettes are delicate and ornate icing decorations that resemble the petals of a rose. They are typically piped onto the cake’s surface in a swirling, spiral pattern, creating a floral-like design. Rosette decorations are often applied using a pastry bag and a specific piping tip to achieve the signature look.
- Layered Cake: The Ombre Rosette Cake is typically a layered cake, with each layer featuring a different shade of the chosen color. The ombre effect is most noticeable when you cut into the cake, revealing the stunning gradient of colors within.
- Flavor Variations: The flavor of the cake can vary widely, from classic vanilla or chocolate to more exotic choices like red velvet, lemon, or any other flavor of preference. The choice of cake flavor and filling can complement the visual appeal of the ombre and rosette design.
- Occasions: Ombre Rosette Cakes are popular choices for special occasions such as weddings, birthdays, baby showers, and anniversaries. They serve as eye-catching centerpieces that not only taste delicious but also add a touch of elegance to the celebration.
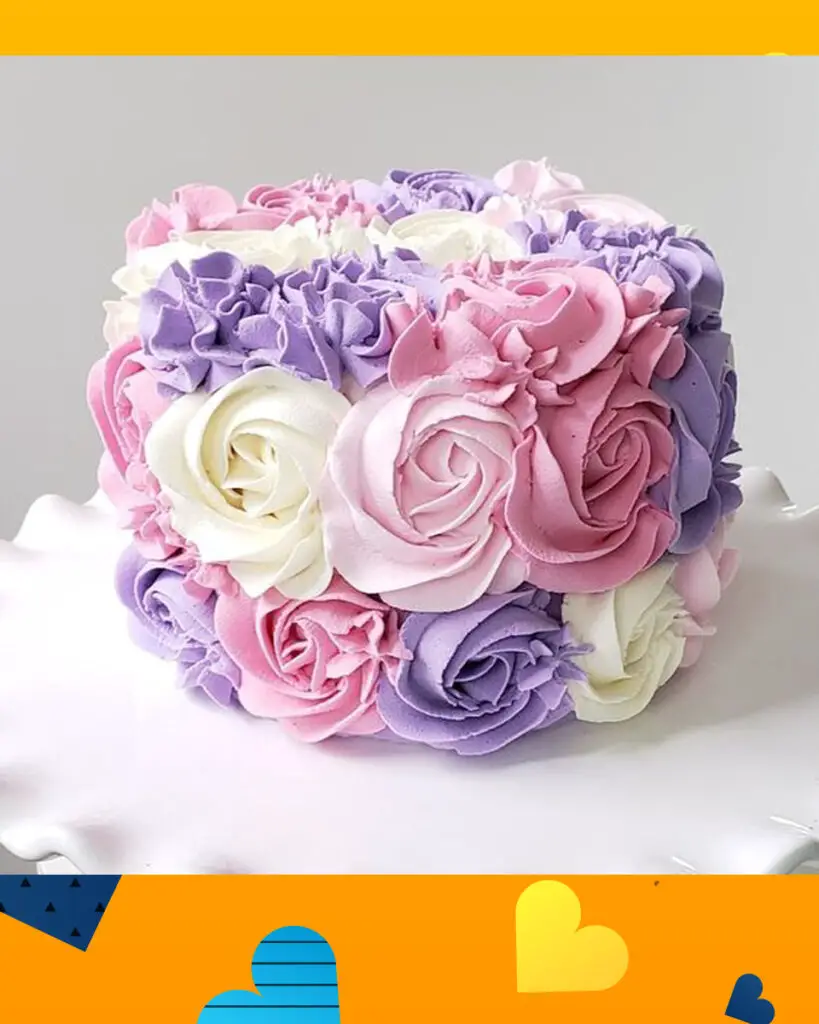
- Customization: While the classic Ombre Rosette Cake is often made with shades of a single color, it can also be customized with various color combinations to match specific themes or preferences. The design possibilities are virtually limitless, allowing for creativity in both color choices and rosette patterns.
The Ombre Rosette Cake is a stunning fusion of art and culinary craftsmanship, making it a favorite among cake decorators and those seeking an elegant and visually captivating dessert for their special events.
How to decorate Ombre Rosette Cake
Decorating an Ombre Rosette Cake involves creating a gradient of colors on the cake’s surface with intricate rosette decorations. Here’s a step-by-step guide to decorating an Ombre Rosette Cake:
Ingredients and Materials:
- Baked and cooled cake layers
- Buttercream frosting in various shades for the ombre effect
- Piping bags
- Large star-shaped piping tip (e.g., Wilton 1M or 2D)
- Cake turntable (optional but helpful)
- Offset spatula
- Cake smoother (for even frosting)
- Food coloring (if tinting your own frosting)
- Cake board or serving platter
Step-by-Step Decoration:
- Prepare Your Cake Layers:
- Bake your cake layers of choice, and allow them to cool completely. Trim the tops of the layers to make them level if needed.
- Tint Your Frosting:
- Divide your buttercream frosting into several bowls, depending on the number of colors you want for the ombre effect. Tint each portion with food coloring to achieve the desired shades. Start with the darkest color at the bottom and gradually lighten the shades as you move upward for the ombre effect.
- Crumb Coat the Cake:
- Place a small amount of your darkest frosting on the cake board or serving platter to anchor the cake. Place the first cake layer on the board, add a layer of frosting, and repeat for each layer. Apply a thin layer of frosting all over the cake to create a crumb coat. Chill the cake in the refrigerator for about 20-30 minutes to set the crumb coat.
- Frost the Cake with Ombre Colors:
- Starting with the darkest color at the bottom, begin frosting the sides of the cake. Use an offset spatula to apply a generous amount of frosting to the bottom part of the cake. Gradually transition to the lighter shades as you move upward. Use the offset spatula and a cake smoother to achieve a smooth ombre effect on the sides of the cake.
- Create the Rosette Decorations:
- Fill a piping bag fitted with a large star-shaped piping tip with one of your frosting shades (usually the lightest). To create rosettes, start from the outside edge of the cake’s top and pipe in a swirling, spiral motion towards the center. Repeat this process, making rosettes of various sizes, to cover the entire top surface of the cake.
- Continue with Rosettes and Colors:
- Switch to the next darker shade of frosting and create another row of rosettes just inside the first row. Repeat this process, transitioning to darker shades as you move toward the center of the cake. Continue until you reach the center, where you can create a final rosette or other decorative design.
- Final Touches:
- Once the top is covered with rosettes and the ombre effect is visible on the sides, you can add additional decorations if desired. These can include edible pearls, sprinkles, or edible flowers.
- Chill and Serve:
- Chill the finished cake in the refrigerator for at least 30 minutes to allow the frosting to set. Before serving, let the cake come to slightly below room temperature for the best flavor and texture.
Decorating an Ombre Rosette Cake requires some patience and practice, especially when achieving the ombre effect and creating rosettes. However, with time and effort, you can create a stunning and delicious centerpiece for your special occasion.
Why you will love Ombre Rosette Cake?
There are several reasons why you’ll love the Ombre Rosette Cake:
- Stunning Visual Appeal: The ombre effect, transitioning from one color to another, creates a captivating and visually stunning cake that immediately draws attention and admiration.
- Artistic Expression: Ombre Rosette Cakes are a canvas for artistic expression. The intricate rosette decorations allow for creativity in design and color choices, making each cake a unique masterpiece.
- Elegant and Timeless: The ombre and rosette combination lends an air of elegance and timelessness to the cake, making it suitable for a wide range of special occasions, from weddings and anniversaries to birthdays and baby showers.
- Delicious Flavors: Underneath the beautiful exterior, you’ll find a delicious cake with a flavor of your choice. The flavor options are diverse, ensuring that you can satisfy your taste preferences.
- Surprise Inside: The ombre effect is most pronounced when you cut into the cake, revealing the stunning gradient of colors within. It adds an element of surprise and excitement for both the eyes and the taste buds.
- Customizable: Ombre Rosette Cakes are highly customizable. You can choose the color palette to match a specific theme or personal preference. This flexibility allows you to tailor the cake to your event.
- Impressive Centerpiece: As a centerpiece for special occasions, this cake not only tastes fantastic but also serves as a focal point that leaves a lasting impression on your guests.
- Celebration-Ready: Whether it’s a wedding, birthday, or any other celebration, the Ombre Rosette Cake is designed to fit the occasion and add an element of grandeur to your festivities.
- Instagram-Worthy: If you enjoy sharing your culinary creations on social media, the Ombre Rosette Cake is highly Instagram-worthy. Its stunning appearance is sure to garner likes and comments.
- Memorable Moments: Serving an Ombre Rosette Cake can turn any event into a memorable and photo-worthy moment, creating lasting memories for you and your guests.
Overall, the Ombre Rosette Cake is a delightful combination of beauty and taste, making it a beloved choice for those seeking a show-stopping dessert that is as pleasing to the eyes as it is to the palate.
Ombre Rosette Cake Recipe
Ingredients:
For the Cake:
- 2 1/2 cups all-purpose flour
- 2 1/2 teaspoons baking powder
- 1/2 teaspoon baking soda
- 1/2 teaspoon salt
- 1 1/2 cups granulated sugar
- 3/4 cup unsalted butter, softened
- 3 large eggs
- 2 teaspoons pure vanilla extract
- 1 1/2 cups buttermilk
For the Buttercream Frosting:
- 2 cups (4 sticks) unsalted butter, softened
- 8 cups powdered sugar (confectioners’ sugar)
- 4 teaspoons pure vanilla extract
- 4-6 tablespoons milk or heavy cream
- Gel food coloring in your chosen shades
Decorations:
- Edible pearls, sprinkles, or edible flowers (optional)
Instructions:
For the Cake:
- Preheat your oven to 350°F (175°C). Grease and flour three 8-inch round cake pans and line the bottoms with parchment paper.
- In a mixing bowl, whisk together the flour, baking powder, baking soda, and salt. Set aside.
- In a separate large bowl, cream together the softened butter and granulated sugar until light and fluffy, using an electric mixer.
- Beat in the eggs, one at a time, ensuring each egg is fully incorporated before adding the next one. Stir in the vanilla extract.
- Gradually add the dry ingredients to the wet ingredients, alternating with the buttermilk, beginning and ending with the dry ingredients. Mix until just combined; do not overmix.
- Divide the cake batter into three equal portions. Tint each portion with gel food coloring to create the ombre effect, starting with the darkest color for one portion and gradually lightening the shades for the other two portions.
- Pour each colored batter into one of the prepared cake pans. Smooth the tops with a spatula.
- Bake in the preheated oven for 25-30 minutes, or until a toothpick inserted into the center of each cake layer comes out clean. Remove the cakes from the oven and let them cool in the pans for 10 minutes, then transfer them to a wire rack to cool completely.
For the Buttercream Frosting:
- In a large mixing bowl, beat the softened butter until creamy and pale using an electric mixer, about 2-3 minutes.
- Gradually add the powdered sugar, one cup at a time, mixing on low speed. Scrape down the sides of the bowl as needed.
- Stir in the vanilla extract.
- Add milk or heavy cream, 1 tablespoon at a time, until you reach your desired frosting consistency. Beat on high speed for an additional 2-3 minutes until the frosting is light and fluffy.
- Divide the frosting into separate bowls and tint each portion with gel food coloring to match the colors of your ombre cake layers.
Assembly and Decoration:
- Place one cake layer on a serving platter or cake board. Spread a layer of frosting on top.
- Add the second cake layer and repeat the frosting process.
- Add the final cake layer and apply a thin layer of frosting all over the cake to create a crumb coat. Chill the cake in the refrigerator for about 20-30 minutes.
- Frost the cake with your ombre-colored buttercream, starting with the darkest color at the bottom and gradually transitioning to lighter shades as you move upward. Use a cake smoother to achieve a smooth ombre effect on the sides.
- Fill piping bags fitted with a large star-shaped piping tip with each frosting color, starting with the lightest shade. Create rosettes on the top of the cake, gradually moving to darker shades as you work toward the center.
- Add any additional decorations like edible pearls, sprinkles, or edible flowers, if desired.
- Chill the finished cake in the refrigerator for at least 30 minutes to allow the frosting to set. Before serving, let the cake come to slightly below room temperature for the best flavor and texture.
Nutrition information
The nutrition information for an Ombre Rosette Cake can vary based on the specific ingredients and serving size. Here’s a general estimate of the nutritional content for a typical slice of Ombre Rosette Cake:
Note: This nutritional information is based on an 8-inch round cake that yields approximately 12 slices.
- Calories: Approximately 400-500 calories per slice (varies based on portion size and frosting thickness).
- Total Fat: Around 15-20 grams per slice, primarily from the butter in the cake and frosting.
- Saturated Fat: Typically 9-12 grams per slice due to the butter content in the cake and buttercream.
- Cholesterol: Approximately 50-100 milligrams per slice, mainly from the eggs and butter.
- Sodium: About 150-250 milligrams per slice, mainly from the baking powder and a small amount from the salt.
- Total Carbohydrates: Approximately 60-70 grams per slice, primarily from the sugar in the cake and frosting.
- Dietary Fiber: Minimal dietary fiber content, typically less than 1 gram per slice.
- Sugars: About 45-55 grams per slice, primarily from the sugar in the cake and frosting.
- Protein: Around 3-5 grams per slice, mainly from the eggs in the cake.
Please note that these values are approximate and can vary depending on the specific recipe and portion size. Additionally, the nutritional content can be influenced by factors such as the choice of cake flavor and the amount of frosting used. If you have specific dietary restrictions or concerns, it’s advisable to calculate the exact nutritional information based on the ingredients you use in your homemade Ombre Rosette Cake.
Tips to make perfect Ombre Rosette Cake
Creating the perfect Ombre Rosette Cake requires attention to detail and some helpful tips to achieve a stunning and delicious result. Here are some tips to help you make the perfect Ombre Rosette Cake:
For the Cake:
- Even Cake Layers: Ensure that your cake layers are of equal thickness to create a level and stable base for decorating. Use a kitchen scale to measure batter for accuracy.
- Proper Cooling: Allow the cake layers to cool completely on wire racks before frosting. Warm cakes can cause the frosting to melt or become uneven.
- Level the Tops: Trim the tops of the cake layers if they have domed during baking. This creates a flat surface for stacking and frosting.
For the Buttercream Frosting:
- Consistency Matters: Achieving the right consistency for your buttercream is crucial. Too stiff, and it can be challenging to pipe rosettes; too soft, and they may lose their shape. Adjust the consistency by adding small amounts of milk or powdered sugar as needed.
- Color Gradation: When tinting your frosting for the ombre effect, use gel food coloring for vibrant and consistent colors. Gradually lighten each portion to create a smooth color transition.
- Prepare Adequate Frosting: Ensure you have enough frosting to cover the entire cake and create the rosettes. It’s better to have extra than run out mid-decoration.
For Assembly and Decoration:
- Chill the Crumb Coat: After applying the crumb coat, chill the cake in the refrigerator. This helps set the frosting and prevents crumbs from appearing in the final layer.
- Smooth Sides: Use a cake smoother to achieve a smooth and even ombre effect on the sides of the cake. A turntable can also be helpful for smoother frosting application.
- Rosette Technique: Practice piping rosettes on a separate surface before decorating the cake. Maintain consistent pressure on the piping bag and move steadily to create uniform rosettes.
- Consistent Piping Tip: Use the same large star-shaped piping tip for all rosettes to ensure uniformity in the design.
- Start with Lightest Color: When decorating the top of the cake with rosettes, begin with the lightest color and work your way to the darkest. This creates a visually pleasing gradient effect.
- Center Finishing Touch: Place a final rosette or other decorative element in the center of the cake to create a polished look.
- Chill Before Serving: Once the cake is decorated, chill it in the refrigerator to set the frosting before serving. This helps maintain the shape of the rosettes and ensures a clean cut when slicing.
- Room Temperature Serving: Before serving, allow the cake to come to slightly below room temperature. This allows the flavors to meld and ensures a more enjoyable texture.
With these tips in mind and a bit of practice, you can consistently create a perfect Ombre Rosette Cake that not only looks stunning but also tastes delicious, making it a memorable centerpiece for your special occasions.
How to serve
Serving an Ombre Rosette Cake involves a few steps to ensure that it looks its best and is enjoyed by everyone. Here’s how to serve an Ombre Rosette Cake:
- Prepare Serving Utensils: Before serving, make sure you have the necessary utensils ready, including a cake server, cake knife, and plates.
- Chilled or Room Temperature: Decide whether you want to serve the cake chilled or at room temperature. Serving it chilled can help the frosting hold its shape better, especially in warm conditions. However, some people prefer cake at room temperature for a softer texture.
- Cutting the Cake: To make clean and neat slices, use a sharp, clean cake knife. Dip the knife into hot water, wipe it dry, and then make your first cut. This helps prevent the frosting from sticking to the knife.
- Slice Equally: Ensure that each slice is of equal width, so all guests receive a fair portion of the ombre layers and frosting.
- Serve on Plates: Carefully transfer each slice to individual plates. If the cake is delicate or has multiple layers, consider using a cake server to assist in the transfer.
- Garnish (Optional): If you have any extra frosting or decorative elements (such as edible flowers or sprinkles), you can add a small garnish to each slice for an extra touch of elegance.
- Serve with Beverages: Offer a selection of beverages that pair well with cake, such as coffee, tea, or milk. This enhances the overall dessert experience.
- Enjoy: Encourage your guests to savor each bite of the Ombre Rosette Cake and appreciate both the visual beauty and the delicious taste.
- Store Leftovers: If there are leftovers, store them in an airtight container in the refrigerator. Proper storage helps maintain the freshness of the cake for future servings.
- Share the Experience: Share the experience of enjoying the Ombre Rosette Cake with your guests, and take pride in the stunning and delicious centerpiece you’ve created.
Remember that serving an Ombre Rosette Cake is not only about satisfying the taste buds but also about creating a memorable and visually appealing dessert experience for everyone to enjoy.
How to store
Properly storing an Ombre Rosette Cake is essential to maintain its freshness and appearance. Here’s how to store it:
1. Refrigeration:
- If your Ombre Rosette Cake has a buttercream frosting, it should be stored in the refrigerator because butter and dairy are perishable ingredients. Cold storage will help prevent spoilage and maintain the cake’s quality.
2. Airtight Container:
- Transfer any leftover cake to an airtight container. Make sure the container is clean and dry before placing the cake inside.
3. Cover the Cake:
- To prevent the cake from drying out and absorbing any fridge odors, cover it with a secure lid or plastic wrap. Ensure that the covering is airtight and doesn’t allow air or moisture to penetrate.
4. Refrigerate Promptly:
- Place the cake in the refrigerator as soon as possible after serving or when you’re finished enjoying a slice. The quicker you refrigerate it, the longer it will stay fresh.
5. Label and Date:
- It’s a good practice to label the container with the date of storage, so you can keep track of how long it’s been stored.
6. Avoid Odor Transfer:
- If your refrigerator tends to have strong odors, consider placing the cake in a designated area away from strong-smelling foods to prevent any flavor transfer.
7. Chill and Serve:
- Before serving the cake again, allow it to come to slightly below room temperature for the best flavor and texture. This may take 20-30 minutes, depending on the size of the cake and the room temperature.
8. Consume Within a Few Days:
- Ombre Rosette Cakes, like most homemade cakes, are best enjoyed within a few days of baking and decoration. Buttercream can start to harden and lose its freshness over time.
9. Freeze for Longer Storage (Optional):
- If you need to store the cake for an extended period, consider freezing it. To do this, wrap the cake tightly in plastic wrap and aluminum foil to prevent freezer burn. Place it in an airtight container if possible. Frozen cake can typically be stored for 2-3 months.
10. Thaw Gradually:
- When you’re ready to enjoy the frozen cake, transfer it to the refrigerator and allow it to thaw slowly for several hours or overnight. This gradual thawing helps maintain the cake’s texture.
By following these storage guidelines, you can enjoy your Ombre Rosette Cake over multiple sittings while keeping it fresh and delicious.
FAQ’s
- Can I make the cake layers and frosting in advance?
- Yes, you can bake the cake layers and make the frosting in advance. Store the cake layers in an airtight container at room temperature or freeze them, and refrigerate the frosting. When ready to assemble, bring everything to the desired temperature and consistency before decorating.
- How do I prevent the cake layers from sticking to the pans?
- Grease and flour the cake pans or use parchment paper rounds to line the bottoms. Additionally, allow the cakes to cool in the pans for about 10 minutes before removing them to minimize sticking.
- Can I use store-bought frosting instead of homemade?
- Yes, you can use store-bought frosting if you’re short on time. Ensure it’s at the right consistency for piping rosettes. You can also tint store-bought frosting to achieve the desired ombre effect.
- How do I achieve a smooth ombre effect on the cake’s sides?
- Use a cake smoother or an offset spatula to create a smooth ombre effect on the sides of the cake. Start with the darkest color at the bottom and blend gradually to the lighter shades as you move upward.
- What if my frosting is too soft or too stiff for piping rosettes?
- Adjust the frosting’s consistency by adding small amounts of milk (if it’s too stiff) or powdered sugar (if it’s too soft). Consistency is key for successful rosettes.
Troubleshooting:
- My cake layers are dry. How can I prevent this?
- Overbaking can lead to dry cake layers. Be sure to follow the recommended baking times and use a toothpick to check for doneness. If it comes out clean or with a few crumbs, the cake is ready.
- The frosting is too runny. What should I do?
- If the frosting is too runny, add more powdered sugar, a little at a time, until you reach the desired consistency. Be cautious not to add too much at once, as it can quickly become too thick.
- My rosettes aren’t holding their shape. What could be the issue?
- Rosettes may not hold their shape if the frosting is too soft or if you’re applying too much pressure while piping. Ensure the frosting is at the right consistency, and practice your rosette technique.
- The colors in my ombre effect aren’t blending well. What can I do?
- To achieve a smooth ombre effect, use gel food coloring for vibrant colors. Gradually transition from dark to light shades, and use a cake smoother or offset spatula to blend the colors on the cake’s sides.
- My cake layers are sticking to the pans. How can I prevent this?
- To prevent cake layers from sticking, ensure the pans are well-greased and floured or use parchment paper rounds on the bottom. Allow the cakes to cool slightly in the pans before removing them.
These FAQs and troubleshooting tips should help you address common issues and create a perfect Ombre Rosette Cake for your special occasions.
Happy baking!

