A Red Velvet Cake Roll is a delightful and visually striking dessert that combines the beloved flavors of classic red velvet cake with the elegant presentation of a rolled cake. This dessert features a tender and vibrant red sponge cake that’s often subtly flavored with cocoa powder and is filled with a luscious cream cheese frosting. The cake is typically rolled into a spiral, creating a visually appealing swirl of red and white that’s perfect for special occasions or as a sweet treat any time of year. Its contrasting colors and rich, slightly tangy flavor make it a beloved favorite among dessert enthusiasts. Whether served as a stunning centerpiece at gatherings or sliced into individual servings, the Red Velvet Cake Roll offers a taste of indulgence and elegance in every bite.
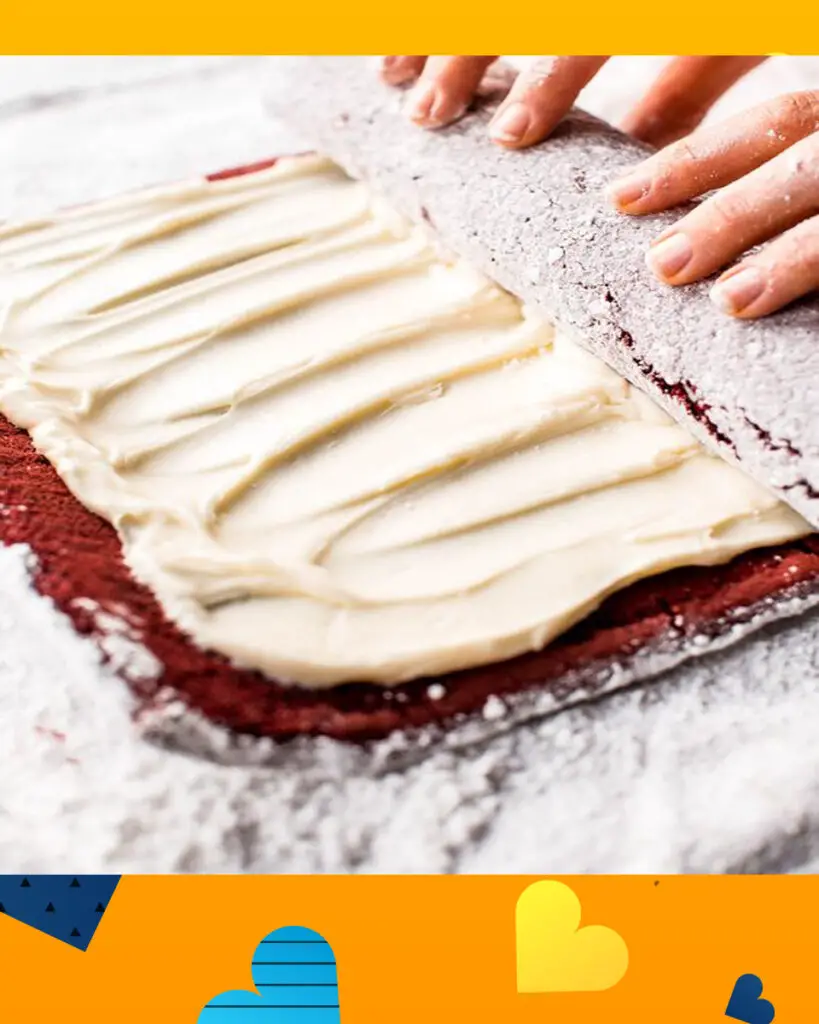
What is Red Velvet Cake Roll?
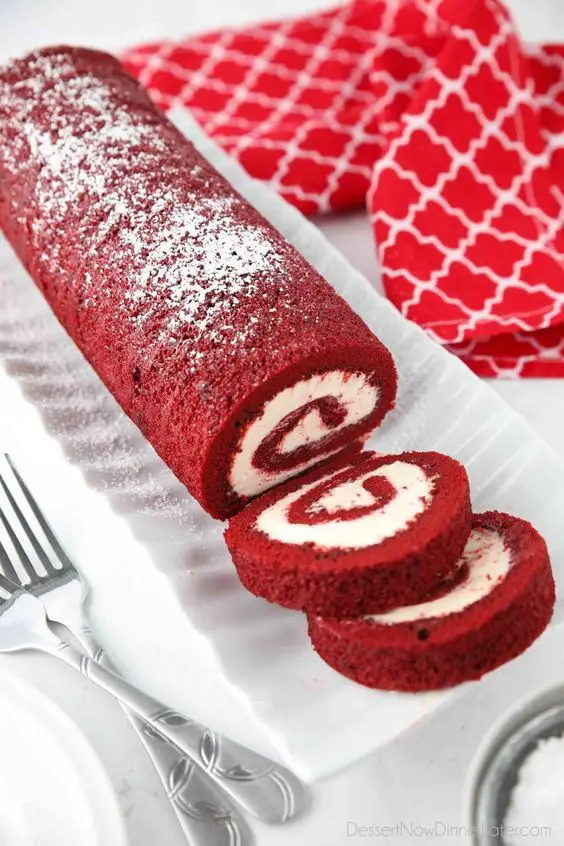
A Red Velvet Cake Roll is a delicious dessert made from a red velvet sponge cake that is typically baked in a thin layer, then rolled up with a creamy filling. Here’s a breakdown of its key components:
- Red Velvet Cake: This cake is characterized by its striking red color and subtle cocoa flavor. It’s made using ingredients like buttermilk, vinegar, and a small amount of cocoa powder, which interact with red food coloring to create the vibrant hue. The cake has a soft and tender texture, making it perfect for rolling without cracking.
- Cream Cheese Filling: The traditional filling for a Red Velvet Cake Roll is a cream cheese frosting. It’s sweet, tangy, and creamy, providing a delightful contrast to the slightly cocoa-flavored cake. The cream cheese frosting is spread evenly over the cake before rolling it up.
- Rolling: After baking, the thin layer of red velvet cake is carefully rolled up, usually while it’s still warm. This is done to create the classic spiral shape of the cake roll. Rolling the cake while warm helps prevent it from cracking and allows it to maintain its shape.
- Decoration: Red Velvet Cake Rolls are often garnished with a dusting of powdered sugar on top for a simple and elegant finish. Some variations may include additional decorations like chopped nuts, chocolate chips, or extra frosting drizzled on top.
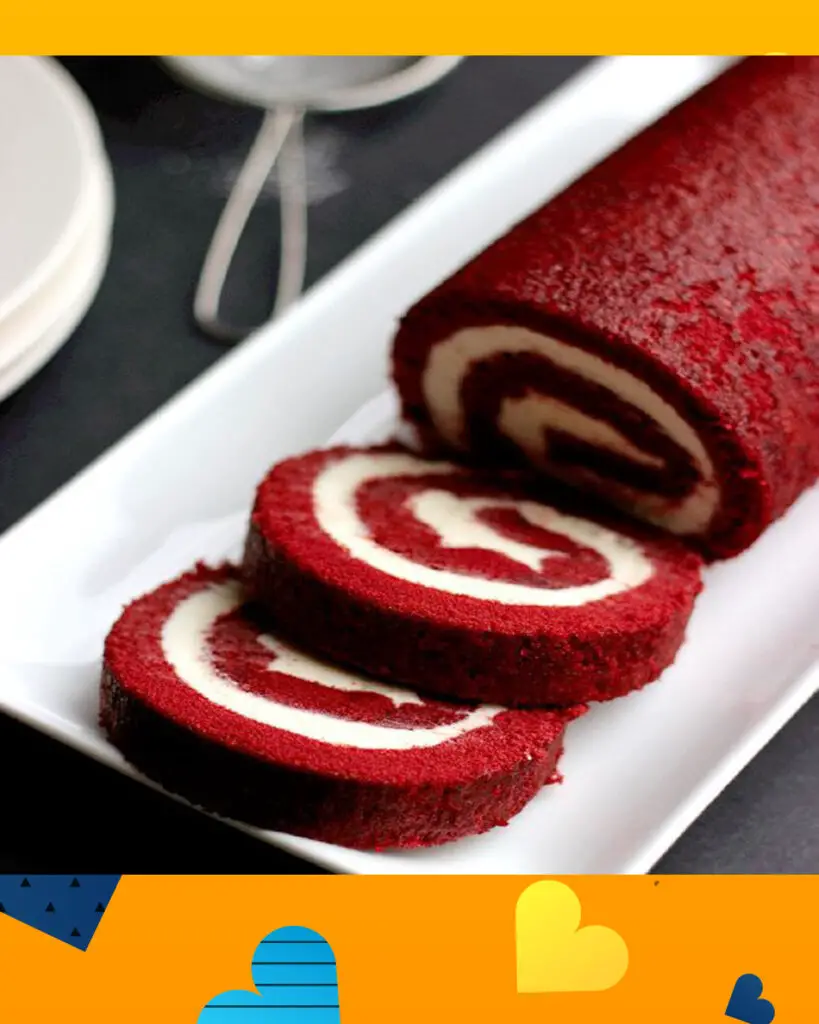
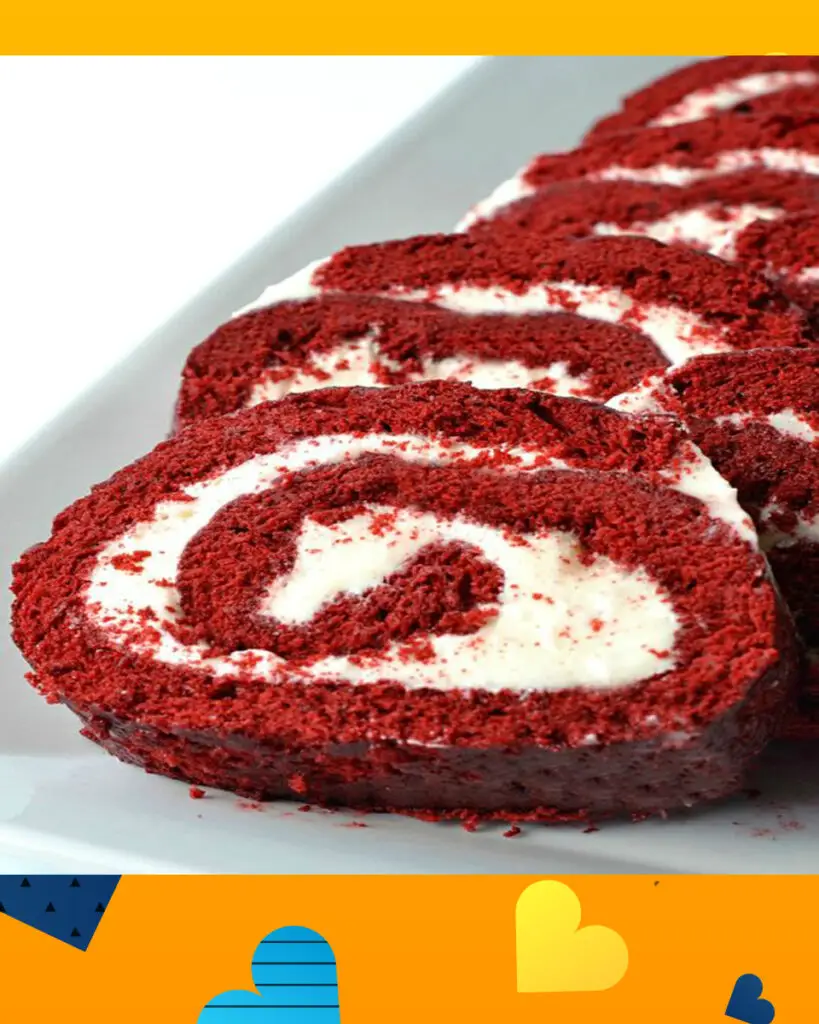
- Slicing: When serving, the Red Velvet Cake Roll is sliced into individual portions, revealing the beautiful swirl pattern of the cake and filling.
This dessert is not only visually appealing but also offers a harmonious blend of flavors and textures. The rich red color, combined with the creamy and slightly tangy cream cheese filling, makes it a favorite choice for special occasions, holidays, or as a delightful treat to enjoy with a cup of coffee or tea.
Can I make a Red Velvet Cake Roll in advance?
Yes, you can make a Red Velvet Cake Roll in advance. Making it ahead of time can be convenient if you want to save time on the day you plan to serve it or if you want to prepare it for a special occasion. Here’s how you can do it:
- Baking the Cake Roll:
- Prepare the Red Velvet Cake Roll as per your recipe.
- Once baked, allow it to cool completely on a wire rack.
- Filling:
- If your recipe includes a cream cheese filling, you can prepare it in advance and store it in an airtight container in the refrigerator.
- Rolling:
- Once the cake is cooled, carefully roll it with a clean kitchen towel or parchment paper, starting from the short end. This helps the cake maintain its shape.
- You can leave the cake wrapped in the towel or parchment paper and then wrap it in plastic wrap to keep it from drying out.
- Storage:
- Store the rolled cake in the refrigerator. It can be kept in the fridge for up to 1-2 days.
- Unrolling and Filling:
- When you’re ready to serve the cake, gently unroll it from the towel or parchment paper.
- Spread the prepared filling evenly over the cake.
- Re-rolling:
- Carefully re-roll the cake with the filling, using the towel or parchment paper to assist you.
- Trim the ends if necessary for a neat presentation.
- Serving:
- You can serve the Red Velvet Cake Roll immediately or refrigerate it for a little while to firm up the filling before slicing and serving.
Why you will love Red Velvet Cake Roll?
- Unique Flavor: Red velvet cake has a distinct flavor that combines the sweetness of traditional cake with a subtle hint of cocoa and a tangy cream cheese frosting. This flavor combination is often a favorite among cake enthusiasts.
- Eye-Catching Appearance: The vibrant red color of the cake roll, contrasted with the white cream cheese filling, makes it visually appealing. It’s often associated with celebrations and special occasions.
- Moist and Tender Texture: Red velvet cake is known for its moist and tender crumb texture, which results from the buttermilk and vinegar used in the recipe. This texture is carried over to the cake roll, making it a delightful treat.
- Cream Cheese Filling: The cream cheese filling used in a Red Velvet Cake Roll adds a rich, creamy, and slightly tangy element to the dessert, complementing the cake’s sweetness perfectly.
- Versatility: Red Velvet Cake Rolls can be enjoyed as a dessert for various occasions, including holidays, birthdays, or simply as a delicious treat. They are also great for sharing with friends and family.
- Easy to Slice: The cake roll’s cylindrical shape makes it easy to slice into individual servings, making it a convenient dessert option for gatherings.
- Festive Appeal: The deep red color of the cake roll often makes it a festive choice for holidays like Christmas, Valentine’s Day, or Independence Day.
- Creative Presentation: Bakers often decorate the top of the cake roll with powdered sugar, cocoa powder, or red velvet cake crumbs, adding to its aesthetic appeal.
In summary, Red Velvet Cake Rolls are loved for their unique flavor, moist texture, creamy filling, and eye-catching appearance. They are a popular choice for dessert enthusiasts and can be enjoyed for various occasions.

Red Velvet Cake Roll Recipe
Ingredients:
For the Cake:
- 3 large eggs
- 1 cup granulated sugar
- 2/3 cup all-purpose flour
- 1/3 cup unsweetened cocoa powder
- 1 tsp baking powder
- 1/4 tsp salt
- 1/3 cup buttermilk
- 2 tbsp vegetable oil
- 1 tsp vanilla extract
- 1 oz red food coloring (about 2 tbsp)
- Powdered sugar (for dusting)
For the Cream Cheese Filling:
- 8 oz cream cheese, softened
- 1/2 cup unsalted butter, softened
- 1 tsp vanilla extract
- 1 1/2 cups powdered sugar
Instructions:
- Preheat your oven to 350°F (175°C). Grease and line a 10×15-inch jelly roll pan with parchment paper, leaving an overhang on the long sides for easy removal.
- In a mixing bowl, whisk together the eggs and granulated sugar until well combined and slightly thickened.
- In a separate bowl, sift together the flour, cocoa powder, baking powder, and salt.
- Combine the buttermilk, vegetable oil, vanilla extract, and red food coloring in a separate bowl.
- Gradually add the dry ingredients to the egg and sugar mixture, mixing until just combined.
- Gently fold in the wet ingredients until you have a smooth batter.
- Pour the batter into the prepared jelly roll pan, spreading it evenly to the edges.
- Bake in the preheated oven for 12-15 minutes, or until the cake springs back when lightly touched.
- While the cake is baking, prepare a clean kitchen towel by sprinkling it generously with powdered sugar.
- Once the cake is done, immediately invert it onto the prepared towel. Carefully peel off the parchment paper.
- Roll up the warm cake and towel together, starting from one of the short ends. Allow it to cool completely in this rolled-up position.
- While the cake is cooling, prepare the cream cheese filling. In a mixing bowl, beat together the softened cream cheese, softened butter, and vanilla extract until smooth.
- Gradually add the powdered sugar and continue to beat until the filling is well combined and creamy.
- When the cake has cooled completely, carefully unroll it.
- Spread the cream cheese filling evenly over the unrolled cake, leaving a small border around the edges.
- Carefully roll the cake back up, this time without the towel. Place it seam side down on a serving platter.
- Chill the Red Velvet Cake Roll in the refrigerator for at least an hour to firm up before serving.
- Before serving, you can dust the top with additional powdered sugar for decoration if desired.
Slice and enjoy your delicious Red Velvet Cake Roll!
This recipe should yield a moist and flavorful Red Velvet Cake Roll with a creamy cream cheese filling, perfect for any special occasion or as a delightful treat.
Nutrition information
The nutrition information for a Red Velvet Cake Roll can vary slightly depending on the specific recipe and serving size, but here’s a general approximation based on a typical homemade Red Velvet Cake Roll with cream cheese filling, sliced into 12 equal servings:
Nutrition per Serving (1/12 of the roll):
- Calories: Approximately 350-400 calories
- Total Fat: About 20-25 grams
- Saturated Fat: 10-12 grams
- Cholesterol: About 90-110 milligrams
- Sodium: Approximately 200-250 milligrams
- Total Carbohydrates: About 35-40 grams
- Dietary Fiber: 1-2 grams
- Sugars: 25-30 grams
- Protein: About 5-6 grams
Please note that these values are approximate and can vary depending on the specific ingredients and proportions used in your recipe. Additionally, the serving size may differ if you slice the cake roll into larger or smaller portions. If you have specific dietary restrictions or need more precise nutritional information, it’s recommended to calculate the values based on the exact ingredients and quantities you use.
Tips to make perfect Red Velvet Cake Roll
Making a perfect Red Velvet Cake Roll requires attention to detail and some tips to ensure success. Here are some tips to help you achieve the best results:
- Measure Ingredients Accurately: Baking is a science, so precise measurements are crucial. Use measuring cups and spoons for dry ingredients and a kitchen scale for more accurate measurements.
- Room Temperature Ingredients: Ensure that ingredients like eggs, cream cheese, and butter are at room temperature. This helps with proper mixing and texture.
- Use Quality Cocoa Powder: Choose a good-quality unsweetened cocoa powder to enhance the flavor of your Red Velvet Cake.
- Red Food Coloring: Use liquid or gel red food coloring to achieve the vibrant red color. Gel food coloring is more concentrated, so you’ll need less of it.
- Buttermilk Substitute: If you don’t have buttermilk on hand, you can make a buttermilk substitute by adding 1 tablespoon of white vinegar or lemon juice to 1 cup of milk. Let it sit for a few minutes until it curdles.
- Prep the Pan Properly: Grease and line your jelly roll pan with parchment paper, making sure to leave overhang on the long sides. This will make it easier to remove and roll the cake later.
- Don’t Overmix the Batter: Mix the batter until just combined. Overmixing can lead to a denser cake.
- Bake Quickly: The cake bakes relatively quickly, so keep a close eye on it. Overbaking can result in a dry and brittle cake that’s difficult to roll.
- Roll While Warm: As soon as the cake comes out of the oven, gently invert it onto a kitchen towel dusted with powdered sugar. Roll it up with the towel inside and allow it to cool completely. Rolling while warm helps prevent cracking when you fill and roll it later.
- Chill the Roll: Once you’ve filled the cake with cream cheese filling, chill it in the refrigerator for at least an hour before slicing. This will help it set and make it easier to slice cleanly.
- Use a Sharp Knife: When slicing the cake roll, use a sharp, serrated knife for clean and neat slices.
- Dust with Powdered Sugar: Before serving, you can dust the top of the Red Velvet Cake Roll with powdered sugar to enhance its appearance.
- Serve Chilled: This cake roll is best when served chilled, so keep it in the refrigerator until you’re ready to serve.
With these tips and a little practice, you’ll be well on your way to making a perfect Red Velvet Cake Roll that’s moist, flavorful, and visually stunning.

How to serve
Serving a Red Velvet Cake Roll is a delightful experience, and it can be done in a few simple steps to ensure that it looks appealing and tastes great. Here’s how to serve a Red Velvet Cake Roll:
1. Slice the Cake Roll: Start by slicing the chilled Red Velvet Cake Roll into individual servings. A sharp, serrated knife works well for this task. You can cut it into 1-inch to 1.5-inch slices, depending on your preference and the number of servings you need.
2. Use a Cake Server or Spatula: Carefully lift each slice of the cake roll using a cake server or a flat spatula. Ensure that you maintain the shape and presentation of the slice as you transfer it to a serving plate.
3. Garnish (Optional): If desired, you can add some extra garnishes to enhance the presentation. A light dusting of powdered sugar over the top of each slice is a classic choice. You can also decorate with additional cocoa powder or crumbled red velvet cake crumbs for a more elaborate look.
4. Serve Chilled: Red Velvet Cake Rolls are best served chilled. Keep the slices in the refrigerator until you’re ready to serve them. The cream cheese filling will firm up slightly, making the cake roll easier to handle.
5. Pair with Extras (Optional): Red Velvet Cake Roll is delicious on its own, but you can enhance the experience by pairing it with complementary extras. A dollop of whipped cream or a scoop of vanilla ice cream can be wonderful additions. You can also serve it with fresh berries for a burst of color and flavor.
6. Enjoy! Invite your guests to savor the delightful combination of flavors and textures in the Red Velvet Cake Roll. The moist and tender cake paired with the creamy cream cheese filling makes for a satisfying dessert experience.
Remember that presentation is key, especially if you’re serving the cake roll for a special occasion or to guests. Take your time to plate each slice neatly, and you’ll have a visually appealing dessert that tastes as good as it looks.
How to store
Properly storing your Red Velvet Cake Roll is essential to maintain its freshness and prevent it from drying out or becoming stale. Here’s how to store it:
1. Refrigeration: Red Velvet Cake Roll should be stored in the refrigerator. It contains cream cheese, which is a perishable dairy product, and refrigeration helps preserve its quality.
2. Wrap in Plastic Wrap: To prevent the cake roll from drying out and absorbing any odors from the refrigerator, tightly wrap it in plastic wrap. Ensure that the entire cake roll is covered, including the ends.
3. Additional Protection (Optional): If you want to provide extra protection against moisture loss, you can wrap the plastic-wrapped cake roll in aluminum foil. This double wrapping helps maintain the cake’s moisture.
4. Use an Airtight Container (Optional): Alternatively, you can place the plastic-wrapped or foil-wrapped cake roll inside an airtight container. This step is optional but can provide an extra layer of protection.
5. Label and Date: If you’re storing the cake roll for an extended period, it’s a good practice to label and date the container or wrapping so you can easily identify it later.
6. Store in the Refrigerator: Place the wrapped Red Velvet Cake Roll in the refrigerator. The cake roll can typically be stored in the refrigerator for up to 3-4 days. Beyond this timeframe, its texture and flavor may start to deteriorate.
7. Serve Chilled: When you’re ready to enjoy the cake roll, take it out of the refrigerator, remove the plastic wrap and any additional wrapping, and slice it into servings. Serve it chilled for the best taste and texture.
8. Freeze (Optional): If you want to store the cake roll for a more extended period, you can freeze it. To freeze, wrap the cake roll as described above, then place it in an airtight freezer-safe container. The cake roll can be frozen for up to 2-3 months. Thaw it in the refrigerator before serving.
By following these storage guidelines, you can ensure that your Red Velvet Cake Roll stays fresh and delicious until you’re ready to enjoy it, whether it’s a leftover portion or a cake roll you’ve made in advance for a special occasion.
FAQ’s about Red Velvet Cake Roll
Q1: How can I prevent my Red Velvet Cake Roll from cracking when I roll it up?
A: Cracking can be a common issue when making cake rolls. To prevent cracking:
- Roll the cake while it’s still warm, shortly after it comes out of the oven.
- Use a clean kitchen towel or parchment paper dusted with powdered sugar to help roll the cake gently but tightly.
- Don’t overbake the cake; it should be moist and slightly springy to the touch when done.
Q2: Can I make a Red Velvet Cake Roll in advance?
A: Yes, you can prepare a Red Velvet Cake Roll in advance. It’s often best to store it in the refrigerator once assembled. This can be done a day or two before serving. Just be sure to cover it well to prevent it from drying out.
Q3: My cream cheese filling is too runny; what should I do?
A: If your cream cheese filling is too runny, it may have been overmixed or may need more powdered sugar for thickness. You can:
- Chill the filling in the refrigerator for a short time to firm it up before spreading it on the cake.
- Gradually add more powdered sugar until you achieve the desired consistency.
- Ensure that your cream cheese is at room temperature before mixing to prevent lumps.
Q4: Can I use a different filling instead of cream cheese frosting?
A: Yes, you can use various fillings in a Red Velvet Cake Roll. Some options include whipped cream, chocolate ganache, or a flavored buttercream frosting. Be creative and choose a filling that complements the red velvet flavor.
Q5: My cake roll looks uneven or lopsided after rolling; how can I fix it?
A: If your cake roll looks uneven or lopsided, don’t worry! You can:
- Trim the uneven edges with a sharp knife for a neater appearance.
- Apply a thin layer of frosting or filling to even out the appearance before serving.
- Dust powdered sugar on top to help conceal imperfections.
Q6: How should I store leftover Red Velvet Cake Roll?
A: Store any leftover Red Velvet Cake Roll in an airtight container in the refrigerator. Be sure to wrap it well to prevent it from drying out. Consume it within 2-3 days for the best taste and texture.
Happy baking!

