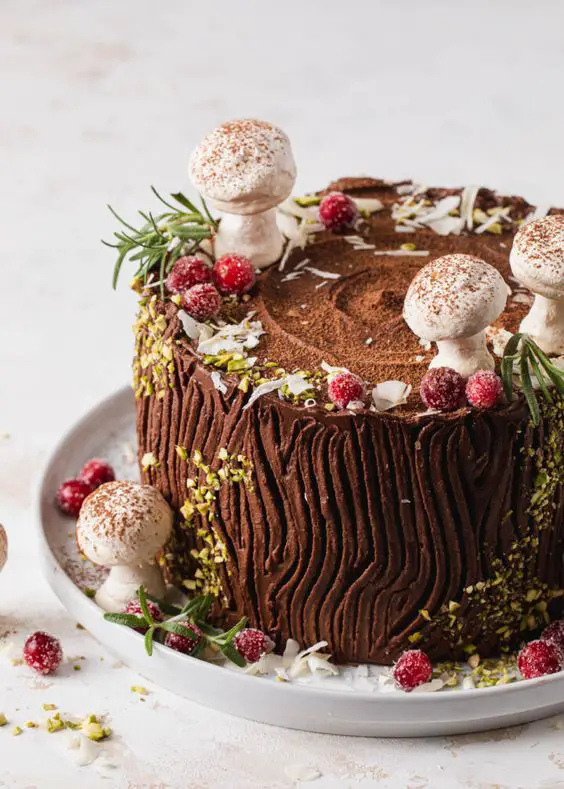
Introducing the enchanting and whimsical masterpiece that is the Tree Stump Chocolate Cake – a delightful fusion of artistry and indulgence that brings the beauty of nature to your dessert table. This captivating creation takes the form of a realistic tree stump, intricately crafted from moist and decadent chocolate cake layers. As if plucked from the heart of an enchanted forest, this cake is adorned with meticulously designed details that mimic the texture and appearance of bark. Each slice reveals a delicious surprise, with layers of rich chocolate cake and velvety fillings that promise a journey through flavors as delightful as the woodland itself. The Tree Stump Chocolate Cake is more than just a dessert; it’s a delightful embodiment of culinary creativity that will leave your guests in awe and your taste buds utterly enchanted.

Why you will love Tree Stump Chocolate Cake?
There are several reasons why you’ll fall in love with a Tree Stump Chocolate Cake:
- Visual Delight: The cake’s intricate design and realistic tree stump appearance make it a true work of art. It’s a showstopper that will impress and captivate anyone who sees it.
- Whimsical Charm: The whimsical nature of the cake adds a touch of enchantment to any occasion. It’s perfect for themed parties, outdoor events, or gatherings that celebrate nature and fantasy.
- Unique and Memorable: The Tree Stump Chocolate Cake stands out from traditional cakes, making it a memorable centerpiece that sparks conversations and creates lasting memories.
- Chocolate Indulgence: Beneath its charming exterior lies a decadent treat. Rich layers of chocolate cake combined with luscious fillings ensure a taste experience that’s as delightful as the cake’s appearance.
- Versatile Occasions: Whether it’s a birthday, wedding, anniversary, or any special celebration, the cake’s versatility allows it to be customized to suit various occasions and themes.
- Attention to Detail: The process of crafting the cake requires meticulous attention to detail, showcasing the skill and craftsmanship of the baker. It’s a testament to dedication and creativity.
- Conversation Starter: The Tree Stump Chocolate Cake is more than just dessert – it’s a conversation starter, a focal point that engages guests and adds an element of surprise to the event.
- Imagination and Creativity: This cake allows bakers to unleash their creativity and imagination, resulting in a one-of-a-kind creation that reflects their artistry and passion for baking.
- Joyful Reactions: Watching the delight on people’s faces when they see and taste the cake is incredibly rewarding. It brings joy and happiness to both the baker and those enjoying it.
- Symbolic Significance: The tree stump design can carry symbolic meaning, representing growth, strength, and connection to nature. It can hold special significance for various celebrations.
In summary, the Tree Stump Chocolate Cake combines artistic craftsmanship, delicious flavors, and a touch of magic to create a dessert that’s truly extraordinary. It’s an expression of creativity and a source of delight that will leave a lasting impression on all who experience it.

How to decorate Tree Stump Chocolate Cake
Decorating a Tree Stump Chocolate Cake involves creating a realistic and visually appealing design that mimics the texture and appearance of a tree stump. Here’s a step-by-step guide to help you decorate your Tree Stump Chocolate Cake:
Ingredients and Materials:
- Baked and cooled chocolate cake layers (usually round)
- Chocolate ganache or buttercream frosting
- Cocoa powder or edible brown coloring
- Offset spatula or cake scraper
- Piping bags and various piping tips (leaf tip, grass tip, etc.)
- Edible fondant or modeling chocolate (optional)
- Edible colors (green for leaves, various shades of brown)
- Edible food-safe paintbrushes
- Edible luster dust (for added shine)
- Edible flowers, mushrooms, or other forest-themed decorations (optional)
Steps:
- Prepare the Cake Layers:
- Bake and cool your chocolate cake layers. Level the tops if necessary to create even surfaces for stacking.
- Stack and Fill the Cake:
- Stack the cake layers with a layer of chocolate ganache or frosting between each layer. This will create the height of the tree stump.
- Crumb Coat:
- Apply a thin layer of ganache or frosting around the entire cake. This is called the crumb coat and helps seal in crumbs for a smooth finish.
- Texture the Stump:
- Using an offset spatula or cake scraper, apply a generous layer of ganache or frosting to the cake’s sides. Create a rough and textured surface that resembles tree bark. Use gentle strokes to mimic the natural patterns.
- Add Cocoa Powder or Edible Coloring:
- Dust the textured surface with cocoa powder or use edible brown coloring to enhance the appearance of the bark. Lightly brush or dust the surface, focusing on the crevices and textured areas.
- Create Tree Rings:
- Use a piping bag with a round tip or a small spatula to create concentric circles on the top of the cake. These circles represent the rings of a tree stump.
- Add Details:
- Use fondant or modeling chocolate to create additional details like knots, cracks, and crevices on the tree stump. Mold and shape them to enhance the realism.
- Pipe Leaves and Grass:
- Use green buttercream and a leaf tip to pipe leaves around the top edge of the cake, resembling foliage. Use a grass tip to pipe grass along the base of the tree stump.
- Paint Details:
- Mix edible colors with a small amount of water to create a paint-like consistency. Use food-safe paintbrushes to add shading, highlights, and depth to the tree stump’s texture.
- Add Luster Dust (Optional):
- For a touch of shine and dimension, apply edible luster dust to certain areas of the tree stump and leaves.
- Top Decorations (Optional):
- Decorate the top of the cake with edible flowers, mushrooms, or other forest-themed decorations to enhance the woodland feel.
- Final Touches:
- Step back and assess your creation. Make any final adjustments or additions to achieve the desired look.
Remember, the key to decorating a Tree Stump Chocolate Cake is attention to detail and embracing creativity. Feel free to adapt and modify the design to suit your vision, and don’t forget to have fun throughout the process!

How to serve Tree Stump Chocolate Cake
Serving a Tree Stump Chocolate Cake can be a delightful experience that adds a touch of whimsy and elegance to your dessert presentation. Here’s how to serve the cake and create a memorable dining experience for your guests:
1. Showcase the Cake: Place the Tree Stump Chocolate Cake on a prominent spot, such as the center of the dessert table or the focal point of your gathering. Allow its intricate design and unique appearance to capture everyone’s attention.
2. Provide Cake-Cutting Tools: Set out a cake server, a sharp knife, and dessert plates near the cake for easy access when it’s time to cut and serve.
3. Explain the Design: Share a brief introduction about the cake’s design and the effort that went into creating the realistic tree stump appearance. This can add an element of intrigue and appreciation among your guests.
4. Cut and Serve: When it’s time to serve the cake, follow these steps:
- Use a sharp knife to cut through the cake layers. Make sure each slice includes a portion of the tree rings for added visual impact.
- Carefully transfer the slices onto dessert plates using a cake server.
- Alternatively, you can pre-slice the cake and arrange the slices on a serving platter for guests to easily pick up.
5. Presentation:
- Arrange the cake slices on dessert plates with care. You can use a dusting of cocoa powder or powdered sugar around the edges of the plates to create a forest floor effect.
6. Garnish and Accompaniments:
- Add a dollop of whipped cream, a drizzle of chocolate sauce, or a sprinkle of edible flowers as a decorative touch and to enhance the flavors.
- Serve each slice with a side of fresh berries, a scoop of ice cream, or a small dollop of fruit compote for a delightful contrast.
7. Share the Experience:
- As you present the cake slices, share a bit about the cake’s flavors, layers, and fillings. This can enhance the dining experience and engage your guests.
8. Capture the Moment:
- Encourage your guests to take photos of their beautifully plated slices and the overall cake display. This adds to the joy and creates lasting memories.
9. Enjoy the Reactions:
- Sit back and enjoy the reactions of your guests as they savor both the visual and culinary delights of the Tree Stump Chocolate Cake.
By thoughtfully presenting and serving the Tree Stump Chocolate Cake, you create an immersive experience that elevates the enjoyment of this artistic and delectable dessert.
How to store Tree Stump Chocolate Cake
Storing a Tree Stump Chocolate Cake properly will help maintain its freshness, flavor, and visual appeal. Here’s how to store the cake to ensure it remains delicious and enjoyable:
- Cover: After the cake has been cut and served, cover any remaining portions of the cake with plastic wrap or aluminum foil. Make sure the wrap is in direct contact with the cake’s cut surfaces to minimize air exposure.
- Refrigeration: If the cake has perishable fillings such as cream, custard, or fresh fruit, it should be refrigerated. Place the covered cake in an airtight container or cake carrier before refrigerating.
- Non-Refrigerated Fillings: If the cake has non-perishable fillings (such as buttercream or ganache), and you plan to consume it within a day or two, you can store it at room temperature in a cool, dry place. Cover it with a cake dome or a large overturned bowl to protect it from dust.
- Avoid Moisture: Moisture can affect the cake’s texture and appearance. If you’re refrigerating the cake, ensure it’s well covered to prevent condensation from forming on the cake’s surface.
- Separate Layers: If you’re storing multiple layers of cake separately, place a piece of parchment paper between each layer to prevent sticking and maintain the cake’s integrity.
- Flavors: Keep in mind that flavors can meld and intensify over time. If the cake has strong flavors, consider storing it separately from other foods to prevent flavor transfer.
- Labeling: If you’re storing the cake for more than a day, consider labeling the storage container with the date to help you keep track of freshness.
- Consumption: While cakes are best enjoyed fresh, the storage duration can vary based on factors like ingredients and climate. Consume the stored cake within a few days for the best quality.
- Reheating: If you’re serving refrigerated cake, allow it to come to room temperature before serving to maximize its flavor and texture.
- Freezing (Long-Term Storage): If you anticipate keeping the cake for an extended period (more than a few days), consider freezing it. Wrap the cake securely in plastic wrap, then aluminum foil. Place it in an airtight container or a resealable freezer bag. Thaw the cake in the refrigerator before serving.
Remember, while storing a cake can help preserve its quality, cakes are typically at their best when enjoyed fresh. Factors such as humidity, fillings, and the cake’s specific recipe can influence storage recommendations, so use your judgment and taste to determine the best storage method for your Tree Stump Chocolate Cake.

Tree Stump Chocolate Cake Recipe:
Ingredients:
Cake:
- 2 cups all-purpose flour
- 2 cups granulated sugar
- 3/4 cup unsweetened cocoa powder
- 2 teaspoons baking powder
- 1 1/2 teaspoons baking soda
- 1 teaspoon salt
- 1 cup buttermilk
- 1/2 cup vegetable oil
- 3 large eggs
- 2 teaspoons vanilla extract
- 1 cup hot water
Ganache Filling:
- 8 ounces high-quality dark chocolate, finely chopped
- 1 cup heavy cream
- 2 tablespoons unsalted butter
- Pinch of salt
Chocolate Buttercream Frosting:
- 1 cup unsalted butter, softened
- 4 cups confectioners’ sugar
- 1/2 cup unsweetened cocoa powder
- 1/4 cup milk or heavy cream
- 1 teaspoon vanilla extract
- Pinch of salt
Decoration and Assembly:
- Cocoa powder or edible brown coloring
- Edible fondant or modeling chocolate
- Edible colors (green for leaves, various shades of brown)
- Edible luster dust (optional)
- Edible food-safe paintbrushes
- Edible flowers, mushrooms, or forest-themed decorations (optional)
Instructions:
Cake:
- Preheat the oven to 350°F (175°C). Grease and flour two 8-inch round cake pans.
- In a large mixing bowl, whisk together the flour, sugar, cocoa powder, baking powder, baking soda, and salt.
- Add buttermilk, vegetable oil, eggs, and vanilla extract to the dry ingredients. Mix until smooth.
- Gradually add hot water to the batter, mixing on low speed. The batter will be thin, but that’s normal.
- Divide the batter evenly between the prepared cake pans. Bake for 25-30 minutes, or until a toothpick inserted into the center comes out clean.
- Allow the cakes to cool in the pans for about 10 minutes, then transfer them to wire racks to cool completely.
Ganache Filling:
- In a heatproof bowl, place the finely chopped chocolate.
- In a saucepan, heat the heavy cream over medium heat until it just begins to simmer. Remove from heat.
- Pour the hot cream over the chopped chocolate. Let it sit for a minute, then gently stir until the chocolate is melted and the mixture is smooth.
- Stir in the butter and a pinch of salt until well incorporated. Let the ganache cool to room temperature.
Chocolate Buttercream Frosting:
- In a mixing bowl, beat the softened butter until creamy.
- Sift together confectioners’ sugar and cocoa powder. Gradually add this mixture to the butter, mixing on low speed until combined.
- Add milk (or heavy cream), vanilla extract, and a pinch of salt. Beat on medium speed until the frosting is smooth and creamy. Adjust the consistency by adding more milk or confectioners’ sugar if needed.
Decoration and Assembly:
- Trim the tops of the cooled cake layers to create even surfaces.
- Place one cake layer on a serving plate or cake board. Spread a layer of chocolate buttercream over the top.
- Carefully spread a layer of ganache filling over the buttercream.
- Place the second cake layer on top, making sure it’s level.
- Use a spatula to crumb coat the entire cake with a thin layer of chocolate buttercream. Refrigerate for about 30 minutes to set.
- Once the crumb coat is set, apply a thicker layer of chocolate buttercream over the entire cake, creating a textured appearance resembling tree bark.
- Dust the cake with cocoa powder or use edible brown coloring to enhance the bark-like texture. Use a paintbrush to add shading and highlights with edible colors.
- Use fondant or modeling chocolate to create knots, cracks, and crevices on the cake’s surface. Shape and mold them to enhance the realism.
- Pipe green leaves using a leaf tip around the top edge of the cake to resemble foliage. Use a grass tip to pipe grass along the base of the tree stump.
- Add additional decorations such as edible flowers, mushrooms, or other forest-themed elements to enhance the woodland effect.
- If desired, apply a touch of edible luster dust to certain areas of the cake to add shine and dimension.
- Allow the cake to come to room temperature before serving.
Note: This detailed recipe yields a Tree Stump Chocolate Cake that’s both visually stunning and deliciously indulgent. Feel free to customize the decorations and flavors to suit your preferences and theme. Enjoy the process of creating this enchanting masterpiece!
Nutrition information:
Please note that the following nutrition information is an approximate estimate based on typical ingredients used in a Tree Stump Chocolate Cake. Actual values may vary depending on specific ingredients, portion sizes, and any variations you make to the recipe. It’s advisable to calculate precise nutrition information based on the exact brands and quantities you use.
Nutrition Information (Per Serving, based on 1 slice of cake, assuming a 10-slice cake):
- Calories: Approximately 450-500 kcal
- Total Fat: Approximately 25-30 g
- Saturated Fat: Approximately 15-20 g
- Cholesterol: Approximately 80-100 mg
- Sodium: Approximately 300-400 mg
- Total Carbohydrates: Approximately 55-65 g
- Dietary Fiber: Approximately 2-4 g
- Sugars: Approximately 40-50 g
- Protein: Approximately 5-7 g
Please Note:
- The values provided above are approximate and may vary based on factors such as portion size and specific ingredients used.
- The chocolate cake layers, ganache filling, and chocolate buttercream frosting contribute to the overall nutrition content of the cake.
- The nutrition information does not account for any additional decorations, such as fondant, modeling chocolate, or edible flowers.
- To obtain accurate nutrition information, it’s recommended to input the exact ingredients and quantities you use into a reliable nutrition calculator or consult with a registered dietitian.
Enjoy your Tree Stump Chocolate Cake in moderation as a delicious and indulgent treat!

Frequently Asked Questions:
1. Can I use a different type of cake for the Tree Stump Cake?
- Yes, you can use a different type of cake, such as vanilla, red velvet, or carrot cake, as long as it’s firm enough to support the decorations and fillings.
2. Can I make the cake in advance?
- Yes, you can bake the cake layers and prepare the ganache filling and buttercream frosting in advance. Assemble and decorate the cake closer to when you plan to serve it for the best texture and appearance.
3. How do I prevent my ganache from being too runny or too thick?
- Achieving the right consistency for ganache involves finding the balance between chocolate and cream. For a thicker ganache, use more chocolate. For a thinner ganache, use more cream.
4. How do I fix air bubbles in my chocolate buttercream frosting?
- To minimize air bubbles, use a spatula to fold and gently mix the frosting after beating. You can also tap the mixing bowl on the counter to release air bubbles before applying the frosting.
5. My cake layers are uneven. How do I level them?
- Use a serrated knife or a cake leveler to trim the tops of the cake layers, making them even and level. This will help create a stable and professional-looking cake.
6. How do I prevent my cake layers from sticking to the pans?
- Grease the cake pans with a thin layer of butter or non-stick cooking spray, then dust them with a light coating of flour. You can also use parchment paper rounds at the bottom of the pans for added insurance.
7. Can I freeze the cake layers for later use?
- Yes, you can freeze the cake layers by wrapping them tightly in plastic wrap and placing them in an airtight container or resealable freezer bags. Thaw them in the refrigerator before assembling the cake.
8. How do I achieve a realistic bark texture on the cake?
- Apply a generous layer of chocolate buttercream to the cake’s sides and use a spatula or cake scraper to create rough and textured patterns that mimic tree bark. Dusting with cocoa powder or using edible brown coloring can enhance the effect.
9. How do I prevent the fondant or modeling chocolate decorations from becoming too hard?
- Knead and warm the fondant or modeling chocolate in your hands before shaping and applying them. If they become too hard, you can briefly microwave them for a few seconds to soften.
10. Can I use other colors for the cake and decorations? – Absolutely! Feel free to customize the cake’s colors and decorations to match your desired theme or occasion. Edible food colors can help you achieve a wide range of hues.
11. How do I fix cracked ganache or buttercream on the cake’s surface? – If your ganache or buttercream develops cracks, you can gently reheat it and apply another thin layer to smooth out the surface.
Remember, baking and decorating the Tree Stump Chocolate Cake might take a little practice, so don’t be discouraged if you encounter minor issues. With creativity and patience, you can troubleshoot and create a stunning and delicious cake.
Have a nice day!

