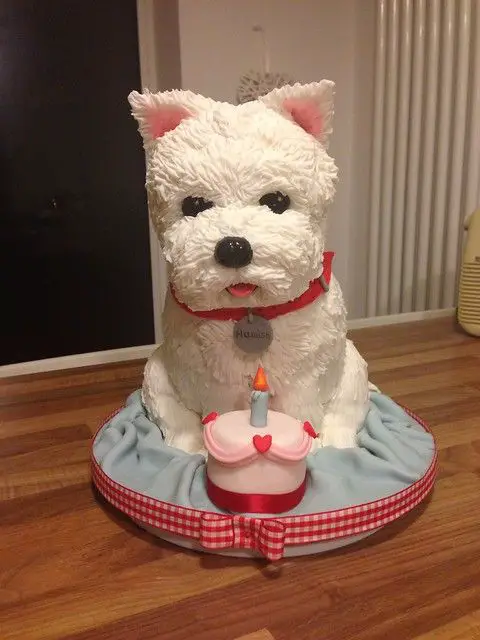
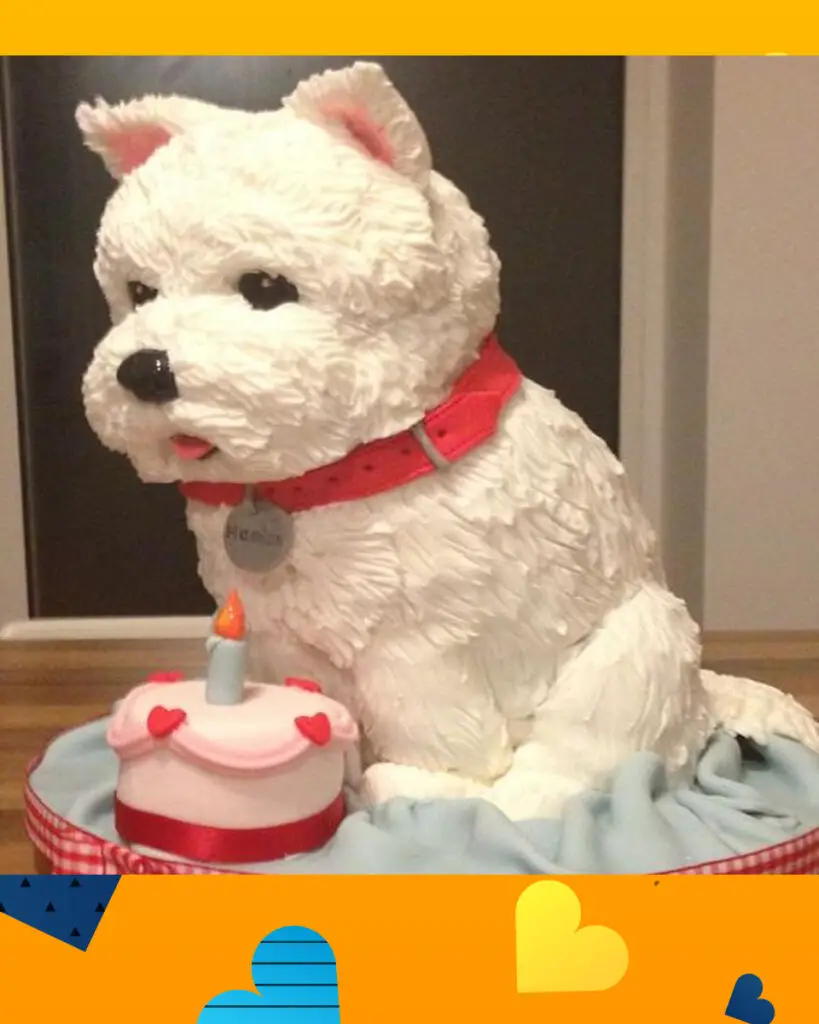
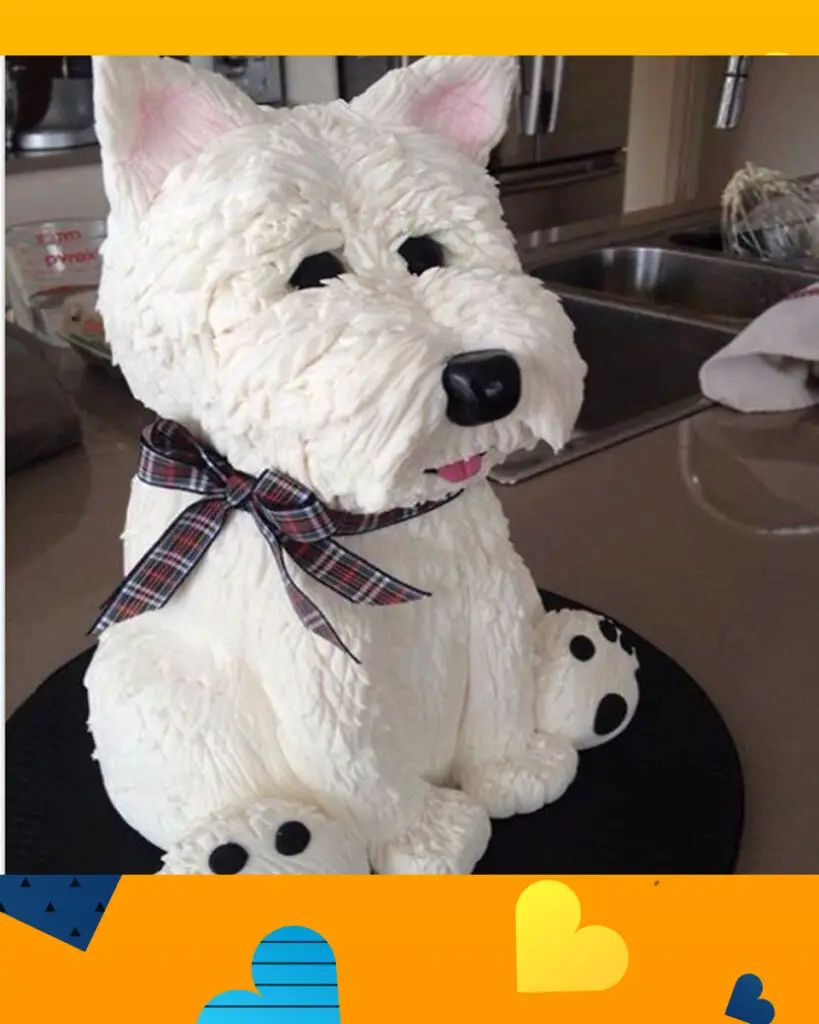
Westie Cake, also known as a “West Highland White Terrier Cake,” is a delightful and whimsical dessert that pays tribute to the beloved West Highland White Terrier breed of dogs. This charming cake is not only a visual treat but also a delicious indulgence for both dog lovers and dessert enthusiasts alike. Crafted to resemble the iconic appearance of a Westie dog, this cake typically features a fluffy white frosting, fondant accents for the dog’s fur, expressive chocolate or fondant eyes, and a playful, lifelike depiction of the Westie’s perky ears and nose. Whether you’re celebrating a special occasion or simply looking to brighten someone’s day with a sweet surprise, Westie Cake is a creative and heartwarming choice that combines culinary artistry with the love for our furry companions.
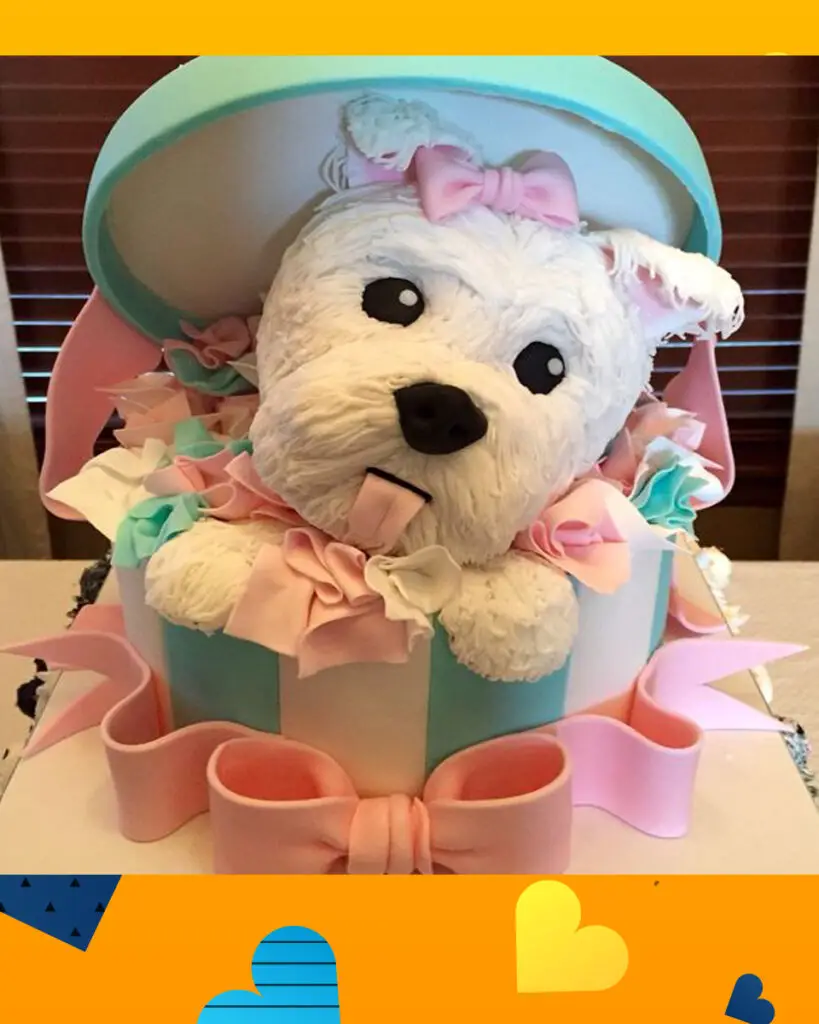
How to decorate Westie Cake
Decorating a Westie Cake to resemble a West Highland White Terrier dog involves several steps and some creativity. Here’s a general guide to help you decorate a Westie Cake:
Ingredients and Tools:
- Baked and cooled cake layers (usually round)
- Buttercream frosting (white or light gray for the fur)
- Fondant (for specific features like ears, nose, and eyes)
- Food coloring (for tinting fondant if needed)
- Edible black gel or food-safe black coloring for details
- Piping bags and tips (for fur texture)
- Fondant or gum paste tools (for shaping and detailing)
- Small brushes for painting on details
- Edible petal dust (optional, for shading)
- Reference images of West Highland White Terriers
Decorating Steps:
- Prepare the Cake:
- Level and stack your cake layers, filling them with frosting between each layer.
- Crumb coat the entire cake with a thin layer of frosting to seal in crumbs. Chill in the fridge until firm.
- Frost the Cake:
- Apply a final layer of white or light gray buttercream frosting over the chilled crumb coat. Smooth it as much as possible for a clean canvas.
- Create the Fur Texture:
- Using a piping bag fitted with a small round tip (or a grass tip for a more textured look), pipe short, upward strokes all over the cake to mimic the texture of a Westie’s fur. Vary the length and direction of the strokes to add realism.
- Make the Features:
- Use white fondant to shape the Westie’s ears, nose, and paws. You can tint the fondant with a little food coloring if necessary to match the desired shades.
- Shape the ears to resemble the Westie’s distinctive perky ears and attach them to the top of the cake.
- Create the nose and place it where the dog’s nose would be.
- Use edible black gel or black fondant to add the eyes. You can paint on details with a small brush or use small white fondant circles for highlights.
- Add Details:
- Use additional fondant or edible coloring to add details like eyebrows, mouth, and whiskers.
- If desired, use edible petal dust to add shading and depth to the fur and facial features.
- Finishing Touches:
- Step back and review your cake, making any final adjustments or adding any missing details to capture the Westie’s personality.
- Serve and Enjoy:
- Once you’re satisfied with the cake’s appearance, it’s ready to be served and enjoyed by your guests.
Remember that decorating a Westie Cake can be a fun and creative process, so don’t be afraid to put your own artistic spin on it. Reference images of West Highland White Terriers can be incredibly helpful in capturing their unique charm and appearance.
Why you will love Westie Cake?
You might love Westie Cake for several reasons:
- Adorable Aesthetic: Westie Cakes are incredibly cute and visually appealing. Their resemblance to West Highland White Terrier dogs makes them a charming and eye-catching dessert that’s perfect for special occasions or simply to bring a smile to someone’s face.
- Creativity and Artistry: Baking and decorating a Westie Cake allows for creative expression. Designing the cake to capture the likeness of a Westie dog is a fun and artistic endeavor, making it a unique and impressive dessert choice.
- Personalization: You can customize a Westie Cake to match your preferences. From the cake flavor to the frosting, colors, and additional decorations, you have the freedom to tailor it to your taste.
- Surprise Factor: If you present a Westie Cake to a dog lover or someone who adores West Highland White Terriers, it can be a delightful and unexpected surprise that shows you put thought and effort into your gift or celebration.
- Deliciousness: Beyond its adorable appearance, Westie Cakes are still cakes, and that means they’re typically delicious! You can choose your favorite cake flavor and enjoy a tasty dessert while appreciating the cake’s artistic design.
- Conversation Starter: Westie Cakes can spark conversations and create memorable moments at gatherings or parties. Guests are likely to be impressed and curious about the cake, making it a fantastic icebreaker.
In summary, Westie Cakes combine creativity, cuteness, and deliciousness, making them a delightful choice for special occasions and celebrations that are sure to be enjoyed by both dog lovers and cake enthusiasts.
Westie Cake Recipe
Ingredients:
For the Cake:
- 2 ½ cups all-purpose flour
- 2 ½ tsp baking powder
- ½ tsp salt
- 1 cup unsalted butter, softened
- 2 cups granulated sugar
- 4 large eggs
- 2 tsp vanilla extract
- 1 cup whole milk
For the Buttercream Frosting:
- 2 cups unsalted butter, softened
- 4 cups powdered sugar
- 2 tsp vanilla extract
- A pinch of salt
- White or light gray food coloring (if desired)
For the Fondant Decorations:
- White fondant
- Black fondant
- Food coloring (for tinting fondant if needed)
For Assembling and Decorating:
- Edible black gel or food-safe black coloring
- Piping bags and small round or grass tip
- Fondant or gum paste tools
- Small brushes for painting on details
- Edible petal dust (optional)
Instructions:
1. Prepare the Cake:
- Preheat your oven to 350°F (175°C). Grease and flour two 8-inch round cake pans.
- In a bowl, whisk together the flour, baking powder, and salt. Set aside.
- In another bowl, cream the softened butter and sugar until light and fluffy.
- Add eggs, one at a time, mixing well after each addition. Stir in the vanilla extract.
- Gradually add the dry ingredients to the wet ingredients, alternating with the milk, beginning and ending with the dry ingredients.
- Divide the batter evenly between the prepared pans.
- Bake for 25-30 minutes or until a toothpick inserted into the center comes out clean.
- Allow the cakes to cool in the pans for 10 minutes, then transfer them to a wire rack to cool completely.
2. Make the Buttercream Frosting:
- In a large mixing bowl, beat the softened butter until creamy and smooth.
- Gradually add the powdered sugar, vanilla extract, and a pinch of salt. Beat until well combined.
- If you want to achieve a light gray color, add a small amount of white or gray food coloring and mix until you reach the desired shade.
3. Assemble and Frost the Cake:
- Level the cake layers to ensure they are flat and even.
- Place one cake layer on a cake board or serving plate.
- Spread a layer of buttercream frosting over the top of the first layer.
- Carefully place the second cake layer on top and frost the entire cake with a thin layer of frosting to create a crumb coat.
- Chill the cake in the fridge for about 30 minutes to set the crumb coat.
- Apply a final layer of white or light gray buttercream frosting over the chilled cake and smooth it as much as possible.
4. Create Fondant Decorations:
- Use white fondant to shape the Westie’s ears, nose, and paws. You can tint the fondant with food coloring if needed.
- Shape the ears to resemble the Westie’s distinctive perky ears and attach them to the top of the cake.
- Create the nose and place it where the dog’s nose would be.
- Use black fondant to add the eyes. You can paint on details with edible black gel or small white fondant circles for highlights.
- Add details like eyebrows, mouth, and whiskers using additional fondant or edible coloring.
- If desired, use edible petal dust to add shading and depth to the fur and facial features.
5. Final Touches and Serving:
- Step back and review your cake, making any final adjustments or adding any missing details to capture the Westie’s personality.
- Once satisfied with the cake’s appearance, it’s ready to be served and enjoyed by your guests.
This detailed formula should help you create a Westie Cake with all the necessary components and quantities. Feel free to adjust the recipe to your preferences and creativity.
Nutrition information
Determining the exact nutrition information for a Westie Cake can be challenging because it can vary based on the specific recipe, portion sizes, and decorations used. However, I can provide you with a general estimate of the nutrition information for a slice of a typical Westie Cake made with the ingredients and quantities listed in the previous recipe, excluding the decorations:
Nutrition Information for One Slice (1/12th of the cake, without decorations):
- Calories: Approximately 450-500 calories
- Total Fat: About 25-30 grams
- Saturated Fat: 15-18 grams
- Cholesterol: 100-120 milligrams
- Sodium: 200-250 milligrams
- Total Carbohydrates: 55-60 grams
- Dietary Fiber: 1-2 grams
- Sugars: 40-45 grams
- Protein: 4-6 grams
Please note that these are rough estimates and can vary depending on the specific ingredients used and the size of the cake slice. The nutrition information does not include any fondant decorations, which are primarily sugar and would add additional calories and carbohydrates.
If you have specific dietary concerns or are looking for more precise nutrition information, it’s advisable to calculate the nutrition facts based on the exact ingredients and quantities you use in your Westie Cake recipe using a nutrition calculator or app.
Tips to make perfect Westie Cake
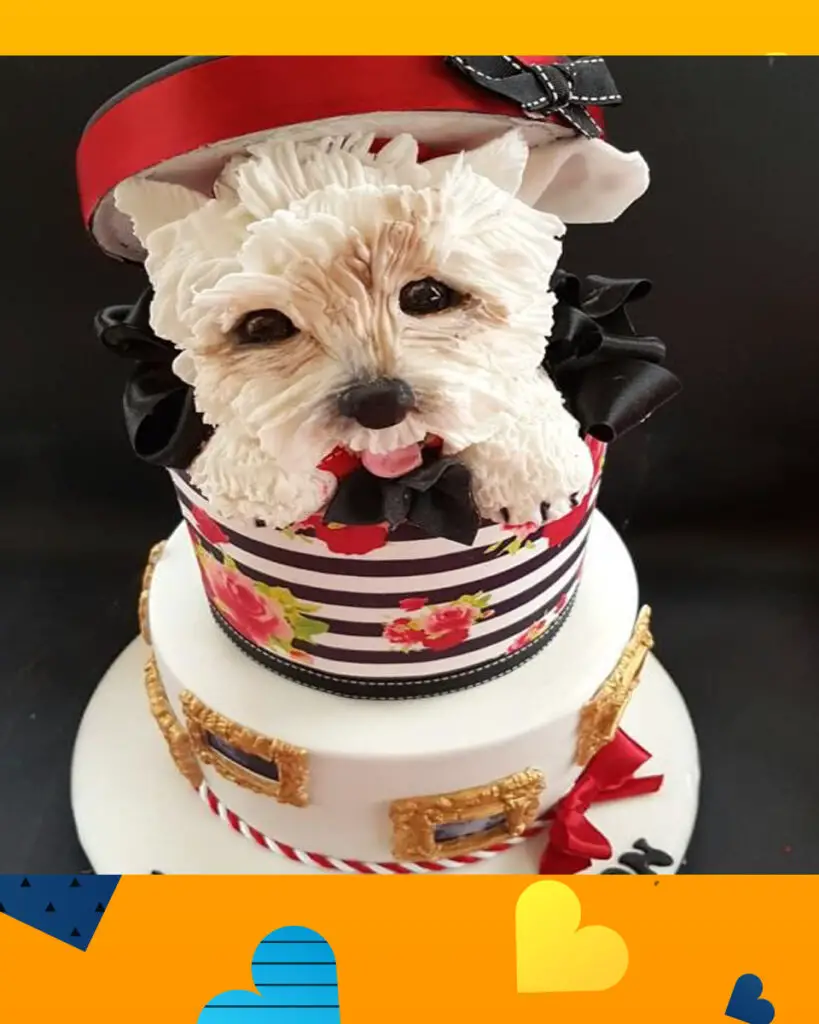
Creating a perfect Westie Cake that not only looks adorable but also tastes delicious requires attention to detail and some cake decorating skills. Here are some tips to help you make the perfect Westie Cake:
- Plan Ahead:
- Start by gathering all the necessary ingredients, tools, and decorations before you begin baking and decorating. Having everything ready will make the process smoother.
- Use a Tried-and-Tested Recipe:
- Choose a reliable cake recipe that you’ve had success with before. Ensure that it’s sturdy enough to support the decorations.
- Level Your Cake Layers:
- After baking, level your cake layers to ensure they are flat and even. This will make stacking and decorating easier.
- Create a Crumb Coat:
- Apply a thin layer of frosting as a crumb coat to seal in any loose crumbs. Chill the cake to set the crumb coat before applying the final layer of frosting.
- Choose the Right Frosting:
- Use a buttercream frosting that is easy to work with and can be smoothed for a clean canvas. You can tint it light gray or leave it white for the Westie’s fur.
- Texture the Fur:
- To achieve a realistic fur texture, use a piping bag fitted with a small round or grass tip to pipe short, upward strokes all over the cake. Vary the length and direction of the strokes.
- Sculpt Fondant Features:
- When making the fondant features (ears, nose, paws), refer to reference images of West Highland White Terriers to capture their distinct characteristics. Take your time to shape these elements accurately.
- Paint Details Carefully:
- Use edible black gel or food-safe coloring to add the eyes, mouth, and any other details. Use a fine brush for precision, and remember that less is often more when it comes to details.
- Consider Shading:
- If you want to add depth to the fur and features, you can use edible petal dust to lightly shade certain areas. Be subtle with the shading to maintain a cute appearance.
- Practice Patience:
- Cake decorating can be time-consuming and may require patience. Take your time with each step to ensure accuracy and quality.
- Seek Inspiration:
- Look at photos of West Highland White Terriers and other Westie Cakes for inspiration. This can help you get a better idea of how to capture the essence of the breed in your cake.
- Keep It Cool:
- If you’re working in a warm environment, keep the cake and fondant decorations in the refrigerator as needed to prevent them from becoming too soft or sticky.
- Don’t Overdo It:
- While it’s important to capture the Westie’s likeness, remember that it’s a cake, and the taste should be just as important as the appearance. Don’t overload the cake with decorations that might compromise its taste.
- Practice and Learn:
- If this is your first time making a Westie Cake, don’t be discouraged if it doesn’t turn out perfectly. Like any skill, cake decorating takes practice, and each attempt will likely improve your skills.
- Enjoy the Process:
- Above all, have fun with the process! Making a Westie Cake is a creative and enjoyable project, so savor every moment of it.
By following these tips and taking your time, you can create a perfect Westie Cake that will impress both visually and in taste.
How to serve
Serving a Westie Cake can be a delightful experience, especially when you want to share the joy and creativity of your cake with others. Here are some steps to help you serve your Westie Cake effectively:
- Prepare a Serving Area:
- Choose a clean, well-lit area to display and serve your Westie Cake. A cake stand or a decorative platter can add an elegant touch.
- Slice the Cake:
- Use a sharp, clean knife or cake server to cut the cake into slices. You can make the slices as large or small as you prefer, depending on the number of guests and their appetite.
- Use a Clean Server:
- Make sure the server or knife is clean for each cut to maintain the cake’s appearance.
- Serve with Care:
- Gently transfer each slice to a dessert plate using a cake server or spatula to keep the frosting and decorations intact.
- Garnish (Optional):
- If desired, you can add a small dollop of extra buttercream frosting or a sprinkle of powdered sugar on top of each slice for an extra touch of sweetness.
- Enjoy and Share:
- Present the slices to your guests, and encourage them to admire the Westie Cake’s design before indulging in the deliciousness.
- Accompaniments (Optional):
- Consider serving the cake with a scoop of vanilla ice cream or a drizzle of chocolate or caramel sauce for added flavor.
- Provide Utensils:
- Ensure that your guests have access to forks or dessert utensils for easy consumption.
- Share the Story:
- If you made the Westie Cake for a special occasion or as a gift, take a moment to share the story behind the cake’s creation. Your guests may appreciate the effort and thoughtfulness you put into making it.
- Store Any Leftovers:
- If there are leftover slices, store them in an airtight container in the refrigerator to keep them fresh. Fondant decorations can become soft and sticky if left at room temperature for too long.
- Capture Memories:
- Don’t forget to capture the moments with your Westie Cake. Take photos of the cake before and after slicing, and consider sharing them on social media or with friends and family.
Serving a Westie Cake can be a memorable experience, as it combines both visual appeal and delicious taste. Whether it’s for a birthday, special occasion, or simply to brighten someone’s day, the charm of a Westie Cake is sure to make the occasion even more special.
How to store
Storing a Westie Cake properly is essential to maintain its freshness and prevent it from drying out or losing its shape. Here are steps on how to store a Westie Cake:
- Room Temperature (Short Term):
- If you plan to serve the cake within the next day or two, you can store it at room temperature. However, take some precautions to ensure it remains fresh:
- Keep the cake in a cool, dry place, away from direct sunlight or heat sources.
- Cover the cake with a cake dome, a cake box, or a large, inverted bowl to protect it from dust and to prevent it from drying out.
- If you plan to serve the cake within the next day or two, you can store it at room temperature. However, take some precautions to ensure it remains fresh:
- Refrigeration (Longer Term):
- For longer storage, particularly if you have leftover cake, it’s best to refrigerate it:
- Place the Westie Cake in an airtight container or wrap it tightly with plastic wrap.
- Refrigerate it, but try to keep it away from strong-smelling foods to prevent any flavor transfer.
- Properly stored, the cake should remain fresh for up to 3-4 days in the refrigerator.
- For longer storage, particularly if you have leftover cake, it’s best to refrigerate it:
- Freezing (Extended Storage):
- If you need to store the Westie Cake for an extended period, freezing is an option:
- First, ensure the cake is completely cooled to room temperature.
- Wrap the cake tightly in plastic wrap to seal it.
- If the cake is large, you can cut it into slices or sections before wrapping.
- Place the wrapped cake in an airtight container or a freezer-safe bag to protect it from freezer burn.
- Label the container with the date to keep track of its freshness.
- When ready to enjoy, allow the cake to thaw in the refrigerator for several hours or overnight.
- If you need to store the Westie Cake for an extended period, freezing is an option:
- Fondant Decorations:
- Fondant decorations, such as the Westie’s ears, nose, and other features, can become soft and lose their shape if exposed to moisture. It’s best to remove and store these decorations separately in a cool, dry place if the cake needs to be refrigerated or frozen.
- Avoid Condensation:
- When transitioning the cake from the refrigerator or freezer to room temperature, be cautious of condensation. Keep the cake covered while it reaches room temperature to prevent moisture from affecting the decorations.
- Serve Chilled:
- If you’ve refrigerated or frozen the cake, consider serving it chilled for a refreshing treat. Allow it to sit at room temperature for a short while before serving to enhance its flavors.
By following these storage guidelines, you can keep your Westie Cake fresh and visually appealing for an extended period, ensuring that you can enjoy both its delightful appearance and delicious taste whenever you’re ready to indulge.
FAQ’s
Q1: Can I use a different type of cake recipe for a Westie Cake?
A1: Yes, you can use different cake recipes, but it’s best to choose a dense and sturdy cake that can support the weight of the decorations. Common choices include vanilla, chocolate, or carrot cake recipes.
Q2: How do I prevent my cake layers from sticking to the pan?
A2: To prevent sticking, grease the cake pans thoroughly with butter or cooking spray and line the bottoms with parchment paper. Additionally, allow the cakes to cool in the pans for about 10 minutes before removing them to minimize the risk of sticking.
Q3: My cake layers are uneven. How can I fix this?
A3: To level uneven cake layers, use a serrated knife or a cake leveler to carefully trim the tops of the cakes until they are flat and even.
Q4: What can I do if my fondant decorations become too soft or sticky?
A4: If your fondant decorations become too soft or sticky due to humidity, you can try placing them in the refrigerator for a short time to firm them up. Be cautious of condensation when transitioning them back to room temperature.
Q5: How can I achieve a more realistic fur texture on the cake?
A5: To achieve a realistic fur texture, use a small round or grass tip on a piping bag filled with buttercream frosting. Pipe short, upward strokes all over the cake, varying the length and direction of the strokes to create depth and texture.
Q6: Can I make a Westie Cake in advance for a special occasion?
A6: Yes, you can make a Westie Cake in advance. You can store it at room temperature for a day or two, in the refrigerator for up to 3-4 days, or in the freezer for longer-term storage. Be sure to wrap and store it properly to maintain its freshness.
Q7: How do I transport a Westie Cake without damaging it?
A7: Transporting a Westie Cake can be challenging due to its delicate decorations. Place the cake on a stable surface, such as a non-slip mat, in a sturdy cake box. Drive carefully and avoid sudden stops or sharp turns. It’s also a good idea to have someone hold the cake box securely during transport.
Q8: My cake layers are crumbling. What went wrong?
A8: Cake layers can crumble if they are overbaked or if the batter is overmixed. To prevent this, follow the recommended baking time and gently fold dry ingredients into the wet mixture until just combined. Avoid overmixing.
Q9: Can I make a Westie Cake without fondant decorations?
A9: Yes, you can make a Westie Cake without fondant decorations. You can use buttercream frosting to create the Westie’s features, such as the ears, nose, and eyes, instead of fondant.
Q10: How can I make my Westie Cake stand out even more?
A10: To make your Westie Cake stand out, pay attention to details and take your time with decorating. Use reference images of West Highland White Terriers for accuracy, and consider adding shading with edible petal dust for depth.
Happy baking!

